
If you wish to shield delicate content material in your Node software, you want a option to authenticate customers. Nevertheless, constructing your individual authentication system is advanced, and time-consuming and if not finished accurately can introduce safety vulnerabilities in your software. Third-party instruments like Passport make authentication simpler.
On this tutorial, you’ll learn to implement authentication in Node utilizing Passport and MongoDB.
What Are Authentication and Authorization?
Whereas authentication and authorization are generally used interchangeably, these two safety ideas have totally different meanings. Authentication is the method of verifying a consumer is who they declare to be whereas authorization is the method of figuring out whether or not an authenticated consumer has entry to sure components of your software.
What Is Passport.js?
Passport.js (or Passport) is an authentication middleware for NodeJS that gives greater than 500 methods for authenticating customers together with passport-local which makes use of a username and password.
This tutorial makes use of passport-local and passport-jwt to safe routes.
Find out how to Set Up Consumer Authentication in NodeJS
Now you understand a bit about consumer authentication and Passport.js, we are able to take a look at find out how to arrange authentication on NodeJS. Beneath, we have outlined the steps you will have to take.
Step 1: Set Up a Node Server
Create a folder named user-auth-nodejs and navigate to it utilizing your terminal.
mkdir user-auth-nodejscd user-auth-nodejs
Subsequent initialize package deal.json.
npm initSince you can be utilizing Specific, a NodeJS backend framework, set up it by operating the next command.
npm i specificNow create a file, app.js, and add the next code to create the server.
const specific = require("specific");
const app = specific();
const PORT = 3000;
app.hear(PORT, () => {
console.log(`Listening on port ${PORT}`);
});
Step 2: Set Up the Database
You want a database to retailer consumer information. You’ll use mongoose to create a MongoDB information schema that defines the construction and sort of information you’ll retailer within the database. Since you might be storing consumer information, create a consumer schema.
Set up mongoose.
npm i mongooseCreate a brand new file, userModel.js, and add the next.
const mongoose = require('mongoose')
const {Schema} = mongoose
const UserSchema = new Schema ({
e-mail: {
sort: String,
required: true
},
password: {
sort: String,
required: true
}
})
const UserModel = mongoose.mannequin('consumer', UserSchema);
module.exports = UserModel;
Earlier than storing the password, you might want to encrypt it for safety functions. You’ll use bcryptjs, a really helpful npm package deal that makes working with encrypted passwords simple.
Set up bcryptjs.
npm i bcryptjsModify usermodel.js to encrypt the password earlier than saving it to the database.
const mongoose = require('mongoose')
const bcrypt = require('bcryptjs');
const {Schema} = mongooseconst UserSchema = new Schema ({
...
})
UserSchema.pre('save', async operate(subsequent) {
strive {
// examine methodology of registration
const consumer = this;
if (!consumer.isModified('password')) subsequent();
// generate salt
const salt = await bcrypt.genSalt(10);
// hash the password
const hashedPassword = await bcrypt.hash(this.password, salt);
// change plain textual content password with hashed password
this.password = hashedPassword;
subsequent();
} catch (error) {
return subsequent(error);
}
});
...
const Consumer = mongoose.mannequin('Consumer', UserSchema);
Right here you might be utilizing a pre save hook to change the password earlier than it’s saved. The concept is to retailer the hash model of the password as a substitute of the plain textual content password. A hash is a protracted advanced string generated from a plain textual content string.
Use isModified to examine whether or not the password is altering because you solely have to hash new passwords. Subsequent, generate a salt and go it with the plain textual content password to the hash methodology to generate the hashed password. Lastly, change the plain textual content password with the hashed password within the database.
Create db.js and configure the database.
const mongoose = require("mongoose");
mongoose.Promise = international.Promise;
const dbUrl = "mongodb://localhost/consumer";
const join = async () => {
mongoose.join(dbUrl, { useNewUrlParser: true, useUnifiedTopology: true });
const db = mongoose.connection;
db.on("error", () => {
console.log("couldn't join");
});
db.as soon as("open", () => {
console.log("> Efficiently linked to database");
});
};
module.exports = { join };
In app.js, hook up with the database.
// hook up with db
const db = require('./db');
db.join();
Step 3: Set Up Passport
Set up Passport and passport-local. You’ll use these packages to register and login customers.
npm i passport
npm i passport-local
Create a brand new file, passportConfig.js, and import passport-local and the userModel.js.
const LocalStraregy = require("passport-local").Technique;
const Consumer = require("./userModel");
Configure Passport to deal with consumer registration.
const LocalStrategy = require("passport-local");
const Consumer = require("./userModel");
module.exports = (passport) => {
passport.use(
"local-signup",
new LocalStrategy(
{
usernameField: "e-mail",
passwordField: "password",
},
async (e-mail, password, finished) => {
strive {
// examine if consumer exists
const userExists = await Consumer.findOne({ "e-mail": e-mail });
if (userExists) {
return finished(null, false)
}
// Create a brand new consumer with the consumer information offered
const consumer = await Consumer.create({ e-mail, password });
return finished(null, consumer);
} catch (error) {
finished(error);
}
}
)
);
}
Within the above code, you might be checking if the e-mail is already in use. If the e-mail doesn’t exist, register the consumer. Be aware that you’re additionally setting the username subject to just accept an e-mail. By default, passport-local expects a username, so you might want to inform it you might be passing in an e-mail as a substitute.
Use passport-local to additionally deal with consumer login.
module.exports = (passport) => {
passport.use(
"local-signup",
new localStrategy(
...
)
);
passport.use(
"local-login",
new LocalStrategy(
{
usernameField: "e-mail",
passwordField: "password",
},
async (e-mail, password, finished) => {
strive {
const consumer = await Consumer.findOne({ e-mail: e-mail });
if (!consumer) return finished(null, false);
const isMatch = await consumer.matchPassword(password);
if (!isMatch)
return finished(null, false);
// if passwords match return consumer
return finished(null, consumer);
} catch (error) {
console.log(error)
return finished(error, false);
}
}
)
);
};
Right here, examine whether or not the consumer exists within the database, and in the event that they do, examine if the password offered matches the one within the database. Be aware you additionally name the matchPassword() methodology on the consumer mannequin so go to userModel.js file and add it.
UserSchema.strategies.matchPassword = async operate (password) {
strive {
return await bcrypt.examine(password, this.password);
} catch (error) {
throw new Error(error);
}
};
This methodology compares the password from the consumer and the one within the database and returns true in the event that they match.
Step 4: Set Up Authentication Routes
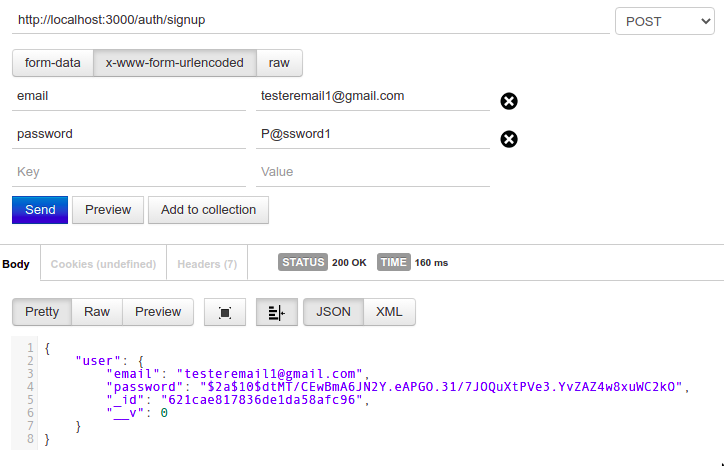
You now have to create the endpoints to which customers will ship information. First up is the signup route which can settle for the e-mail and password of a brand new consumer.
In app.js, use the passport authentication middleware you simply created to register the consumer.
app.put up(
 "/auth/signup",
passport.authenticate('local-signup', { session: false }),
(req, res, subsequent) => {
// enroll
res.json({
consumer: req.consumer,
});
}
);
If profitable, the signup route ought to return the created consumer.
Subsequent, create the login route.
app.put up(
"/auth/login",
passport.authenticate('local-login', { session: false }),
(req, res, subsequent) => {
// login
res.json({
consumer: req.consumer,
});
}
);
Step 5: Add Protected Routes
Up to now, you’ve gotten used Passport to create a middleware that registers a consumer within the database and one other that enables a registered consumer to register. Subsequent, you’ll create an authorization middleware to guard delicate routes utilizing a JSON net token(JWT). To implement JWT authorization, you might want to:
- Generate JWT token.
- Move the token to the consumer. The consumer will ship it again in authorization requests.
- Confirm the token despatched again by the consumer.
You’ll use the jsonwebtoken package deal to deal with JWTs.
Run the next command to put in it.
npm i jsonwebtoken
Subsequent, generate a token for every consumer that efficiently logs in.
In app.js, import jsonwebtoken and modify the login route like beneath.
app.put up(
"/auth/login",
passport.authenticate('local-login', { session: false }),
(req, res, subsequent) => {
// login
jwt.signal({consumer: req.consumer}, 'secretKey', {expiresIn: '1h'}, (err, token) => {
if(err) {
return res.json({
message: "Did not login",
token: null,
});
}
res.json({
token
});
})
}
);
In a real-life software, you’d use a extra difficult secret key and retailer it in a configuration file.
The login route returns a token if profitable.

Use passport-jwt to entry protected routes.
npm i passport-jwtIn passportConfig.js, configure the passport-jwt.
const JwtStrategy = require("passport-jwt").Technique;
const { ExtractJwt } = require("passport-jwt")
module.exports = (passport) => {
passport.use(
"local-login",
new LocalStrategy(
...
);
passport.use(
new JwtStrategy(
{
jwtFromRequest: ExtractJwt.fromHeader("authorization"),
secretOrKey: "secretKey",
},
async (jwtPayload, finished) => {
strive {
// Extract consumer
const consumer = jwtPayload.consumer;
finished(null, consumer);
} catch (error) {
finished(error, false);
}
}
)
);
};
Discover you might be extracting the JWT from the authorization header as a substitute of the request physique. This prevents hackers from intercepting a request and grabbing the token.
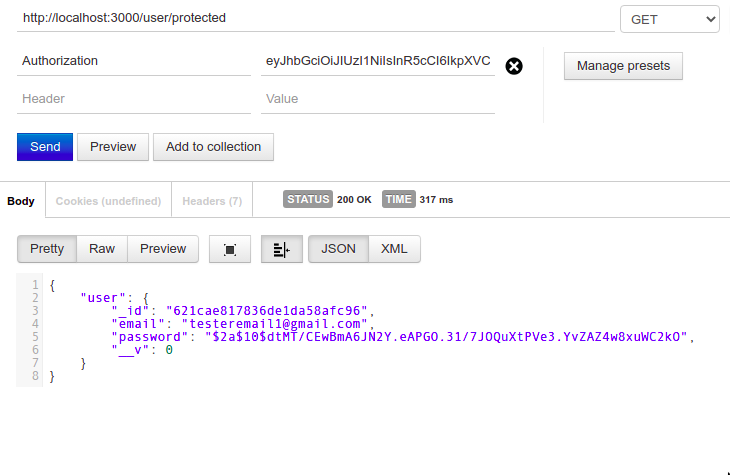
To see how passport-jwt guards routes, create a protected route in app.js.
app.get(
"/consumer/protected",
passport.authenticate("jwt", { session: false }),
(req, res, subsequent) => {
res.json({consumer: req.consumer});
}
);
Solely a request with a legitimate JWT returns the consumer information.
Now You are Able to Take Your Consumer Authentication to the Subsequent Degree
On this tutorial, you discovered how one can authenticate customers utilizing an e-mail and a password with the assistance of Passport. It may appear daunting at first, however the course of is comparatively simple. You possibly can go even additional and use third-party id suppliers supported by Passport comparable to Twitter, Fb, and Google.
Learn Subsequent
About The Creator
