
Constructing your DIY Arduino thermometer is a enjoyable and sensible method to broaden your tinkering abilities, however the place must you get began? Be part of us as we delve into the wiring and coding that goes into turning an Arduino, a DS18B20 temperature probe, and an OLED show right into a exact digital thermometer that may work nicely in rooms, fish tanks, and even open air.
What Do You Have to Make a DIY Arduino Digital Thermometer?
.jpg)
All of those parts could be discovered on web sites like eBay and Amazon.
An Arduino Board
You need to use nearly any Arduino with a 5V output for this challenge. We’re utilizing an Arduino Professional Micro in order that our completed thermometer is compact, however you should utilize a bigger board like an Arduino Uno if you want to keep away from soldering for this challenge.
DS18B20 Temperature Probe
DS18B20 temperature sensors could be discovered as small stand-alone sensors, PCBs with sensors hooked up, or as waterproof probes on lengthy wires. We selected the latter, as this allows us to make use of our thermometer inside a fish tank, however you may decide any variant of the DS18B20 temperature sensor. In contrast to different kinds of temperature sensors, DS18B20s present a direct-to-digital sign to your Arduino, quite than the analog indicators that come from choices like LM35 temperature sensors.
An OLED/LCD Display screen
The show you select on your thermometer can have a huge impact on the completed product. We picked a 1.3-inch I2C-compatible monochrome white OLED show for our thermometer, however you may select no matter you want so long as it helps I2C.
Extra Small Components
- 4.7K (kiloohm) resistor
- 28 to 22 AWG silicone/PVC insulated wire
- A breadboard (non-obligatory for many who don’t want to solder)
Wiring Your DIY Thermometer
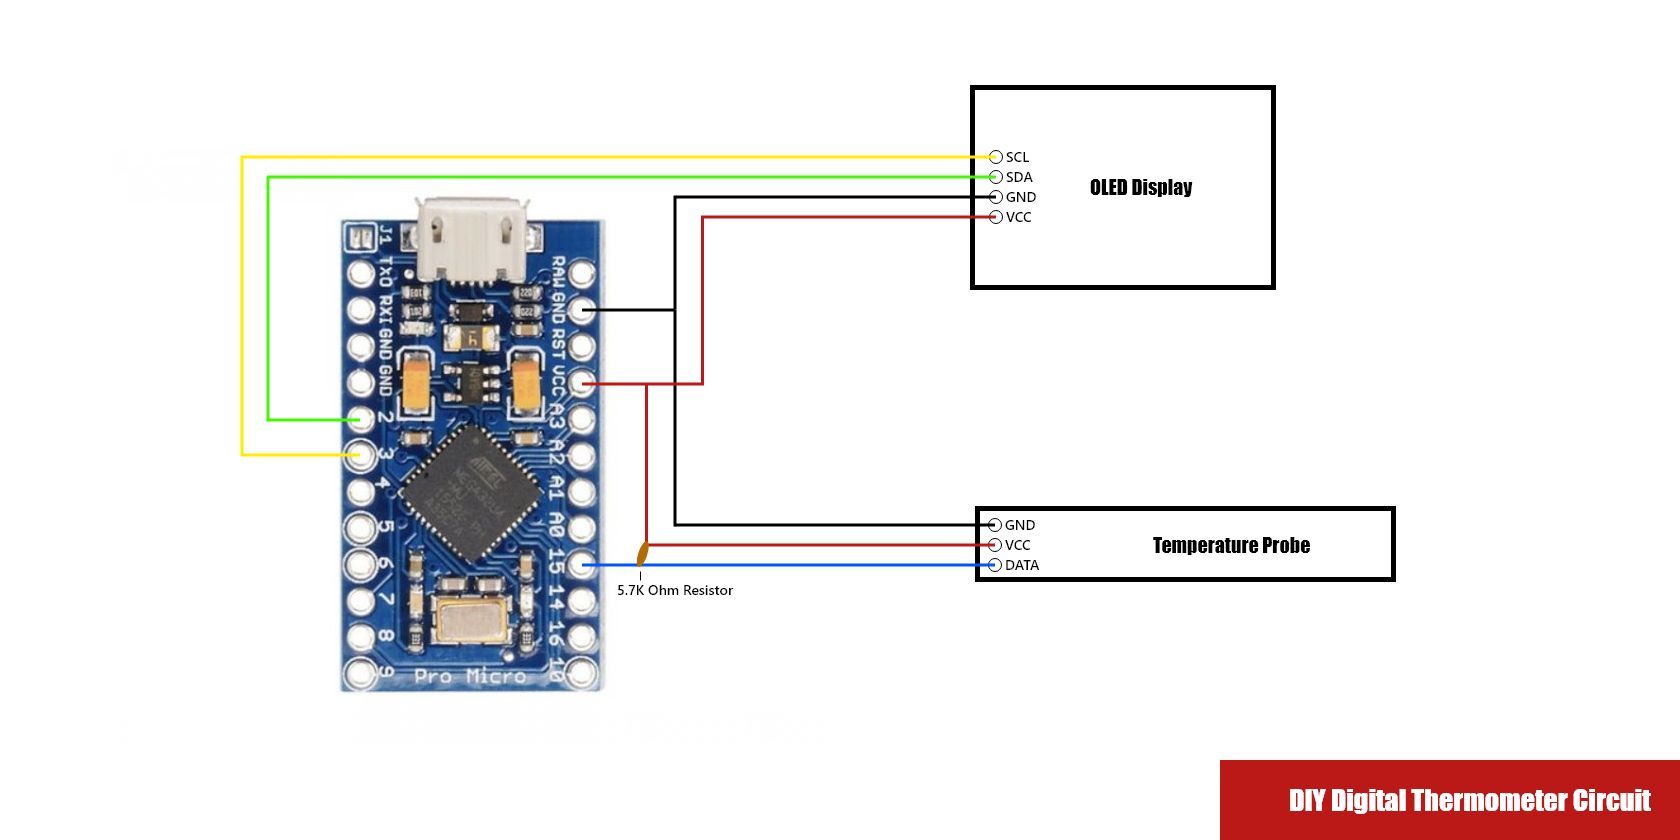
The wiring for this challenge is way easier than you may think. Utilizing the circuit diagram above, you may create your personal DIY digital thermometer with little effort, however we have additionally damaged the diagram down under to make it simpler to observe.
Wiring the DS18B20 Temperature Probe
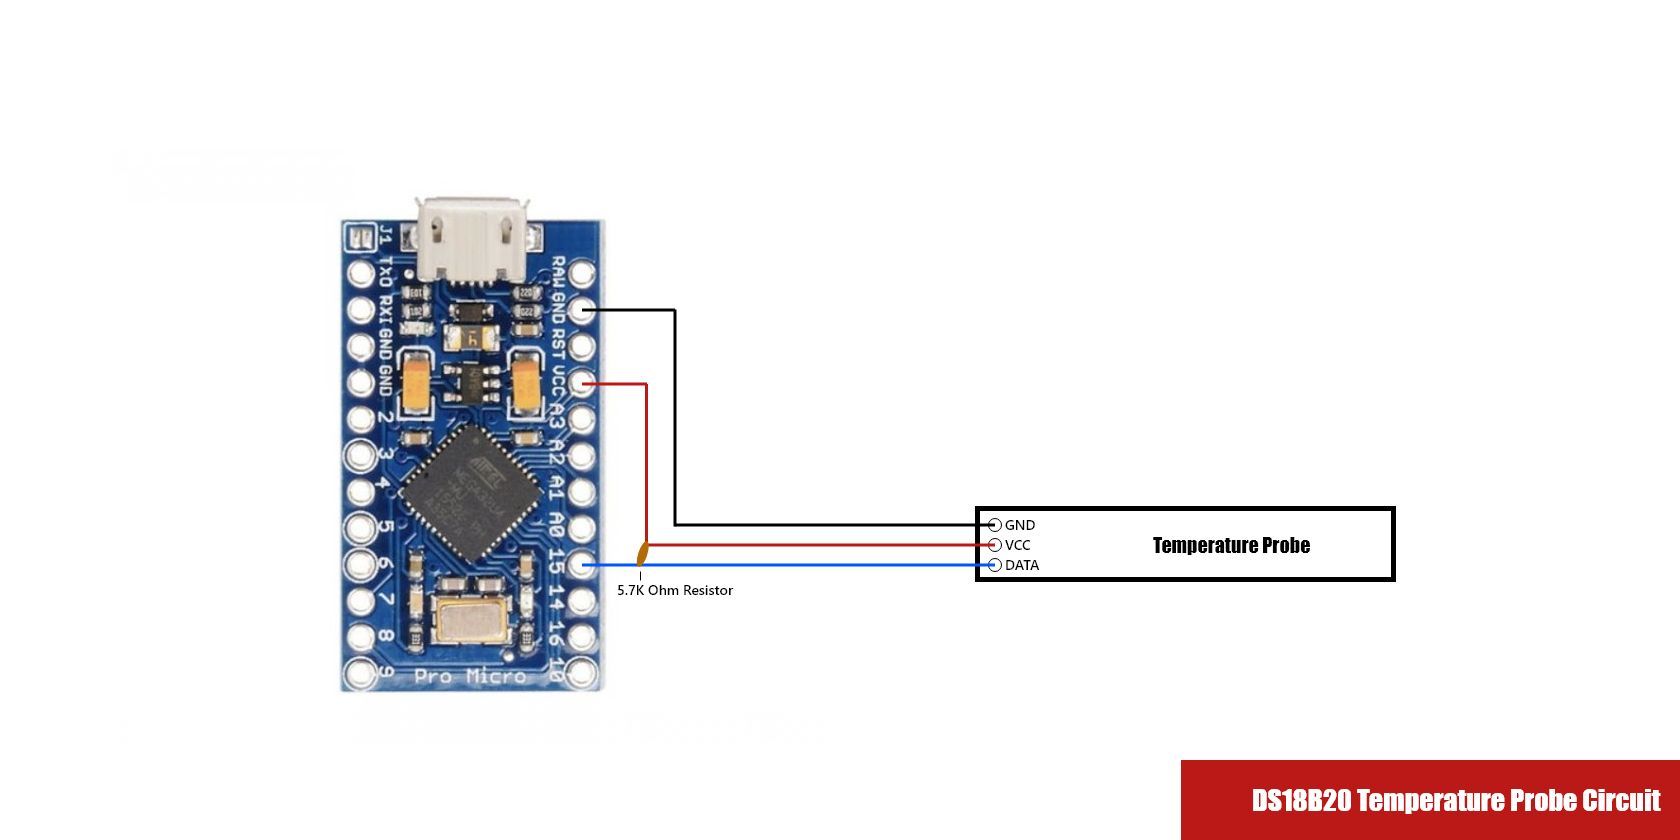
Wiring your DS18B20 temperature probe accurately is significant to this challenge, and it is advisable just remember to use the 4.7K resistor we talked about earlier or your probe is not going to work correctly. The probe comes with three wires: Floor (often black), VCC (often pink), and Information.
- VCC connects to a 5V pin in your Arduino
- Floor connects to a GND pin in your Arduino
- Information can connect with any digital pin in your Arduino (we picked digital pin 15)
- The Information and VCC wires additionally should be related to 1 one other with a 4.7K resistor
Wiring the I2C OLED Show
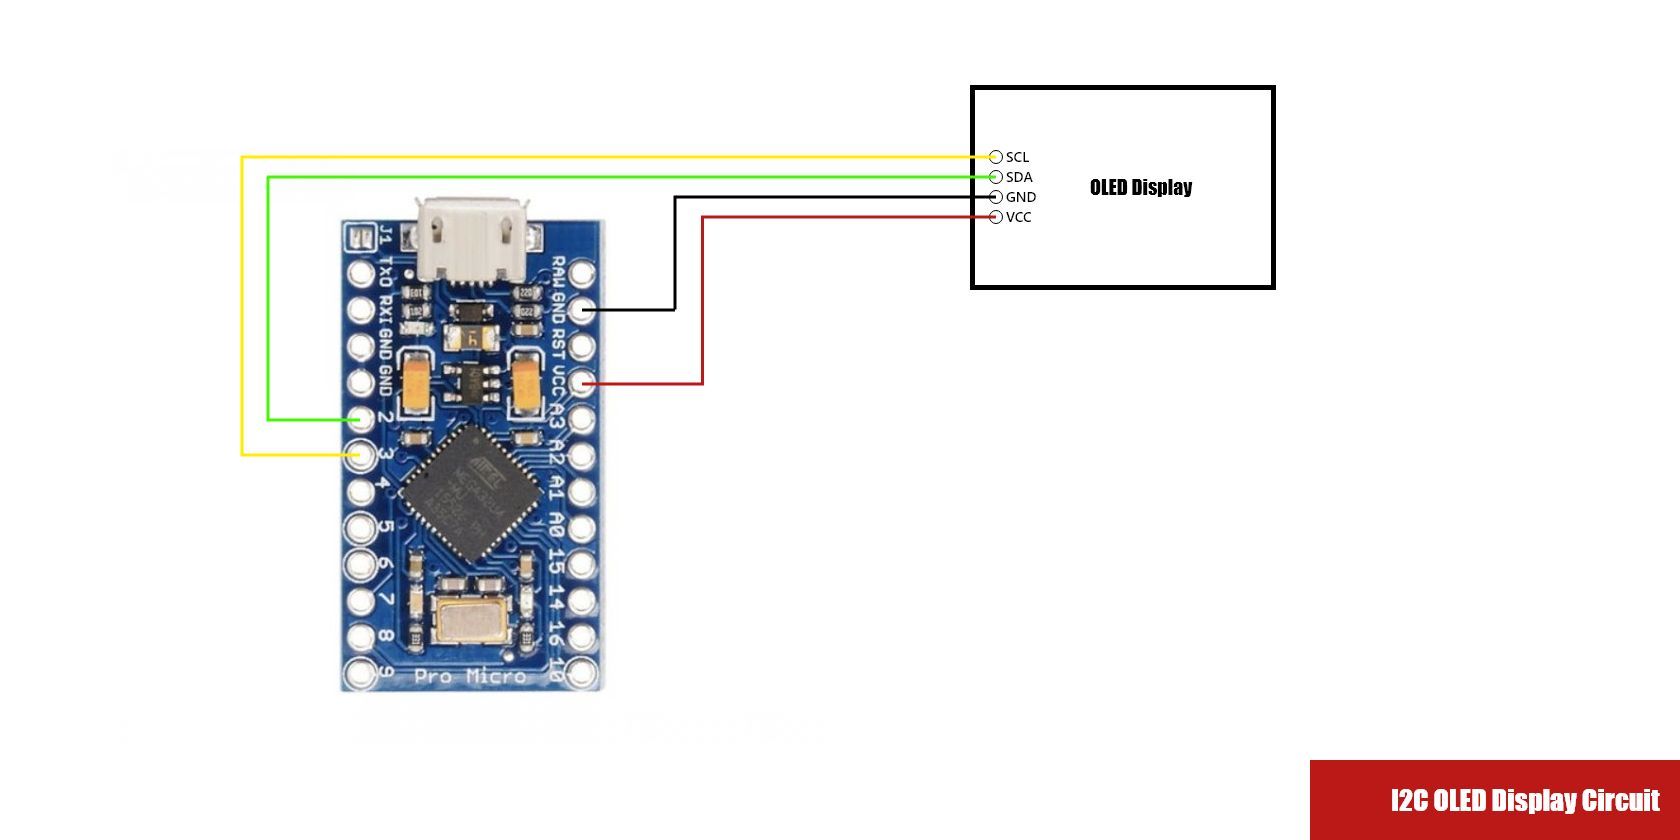
As we’re utilizing an I2C connection between our OLED show and our Arduino, we solely have to attach 4 wires earlier than we are able to begin utilizing our show: VCC, Floor, SDA, and SCL. Nearly each trendy Arduino has SDA and SCL pins built-in, offering the flexibility to attach as much as 128 distinctive I2C parts to a single board.
Our Arduino Professional Micro has SDA on digital pin 2 and SCL on digital pin 3, however you could must search for a pinout diagram of the particular board you may have chosen earlier than you begin.
- VCC connects to a 5V pin in your Arduino
- Floor connects to a GND pin in your Arduino
- SDA connects to the SDA pin in your Arduino
- SCL connects to the SCL pin in your Arduino
Testing Your Circuit
It is essential that you just take a look at the circuit you may have made earlier than you begin writing the ultimate code for it, however you should utilize the instance initiatives that include the libraries mentioned under to check the circuit you may have made.
Coding Your Temperature Sensor & OLED Show
Coding your DIY digital thermometer is trickier than wiring it up, however the Arduino IDE can be utilized for this to make it simpler.
Selecting the Right Libraries
- OLED Show Library: We’re utilizing the Adafruit_SH1106.h library for our show, as that is the library that it was designed to work with. Different OLED shows might use their very own libraries, just like the Adafruit_SSD1306.h library, and you’ll often discover out which one you want from the product web page you bought your show from.
- DS18B20 Temperature Probe: We want two libraries for our temperature probe. DallasTemperature.h is used to gather temperature knowledge, and OneWire.h to make our single-wire connection potential.
As soon as these libraries have been put in and included in your challenge, your code ought to look one thing just like the snippet under. Word that we now have additionally included code to set the pins for our parts.
#embody <Adafruit_SH1106.h> //Show library
#embody <OneWire.h>
#embody <DallasTemperature.h> //Temp probe library
#outline OLED_RESET -1
Adafruit_SH1106 show(OLED_RESET);
#outline ONE_WIRE_BUS 15 //Temp probe knowledge wire pin
OneWire oneWire(ONE_WIRE_BUS); //Inform OneWire which pin we're utilizing
DallasTemperature sensors(&oneWire); //OneWire reference to Dallas Temperature
Constructing the Features
- void setup: We’re utilizing the usual setup perform to initialize each our show and our temperature probe.
- void loop: Our customary loop perform will solely be used to name our Show perform.
- void Show: We now have added a Show perform that calls our Temp perform and offers data to our show.
- int Temp: Our Temp perform is used to get a temperature studying for our Show perform.
As soon as full, this could seem like the snippet under.
void setup() {
}
void loop() {
}
void Show() {
}
int Temp() {
}
Coding the OLED Show
Earlier than we are able to add code to our Show perform, we’d like to verify the OLED panel is initialized in our void setup perform. First, we use a show.start command to get the show began, adopted by a show.clearDisplay command to verify the show is evident.
void setup() {
show.start(SH1106_SWITCHCAPVCC, 0x3C); //Change based mostly in your show library
show.clearDisplay();
}
From right here, we are able to add code to our Show perform. This begins with one other show.clearDisplay command, earlier than declaring a brand new integer variable with a worth that calls the Temp perform (we’ll cowl this later). We’re then ready to make use of this variable to show the temperature on the show utilizing the next code.
void Show() {
show.clearDisplay();
int intTemp = Temp(); //Calls our Temp perform
show.setTextSize(3); //Units our textual content dimension
show.setTextColor(WHITE); //Units our textual content colour
show.setCursor(5, 5); //Units our textual content place on the show
show.print(intTemp); //Prints out the worth offered by the Temp perform
show.drawCircle(44, 7, 3, WHITE); //Attracts a level image
show.setCursor(50, 5);
show.print("C"); //Provides C to point that our temperature is in Celsius
}
Coding the DS18B20 Temperature Probe
Like our show, our temperature probe additionally wants setup code to initialize the part.
void setup() {
show.start(SH1106_SWITCHCAPVCC, 0x3C);
show.clearDisplay();
sensors.start();
}
Subsequent, it is time to program the probe itself, and we have to add code to our Temp perform. First, we’ll request the temperature from our probe, adopted by recording the outcome as a float variable and changing it into an integer. If this course of is profitable, the temperature is returned to the Show perform.
int Temp() {
sensors.requestTemperatures(); // Ship the command to get temperatures
float tempC = sensors.getTempCByIndex(0); //This requests the temp in Celsius and assigns it to a float
int intTemp = (int) tempC; //This converts the float to an integer
if (tempC != DEVICE_DISCONNECTED_C) //Examine if our studying labored
{
return intTemp; //Return our temperature worth to the Show perform
}
}
Ending Up
Lastly, we simply want to inform our important loop perform to name our Show perform with every cycle of the code, leaving us with a challenge that appears like this.
#embody <Adafruit_SH1106.h> //Show library
#embody <OneWire.h>
#embody <DallasTemperature.h> //Temp probe library
#outline OLED_RESET -1
Adafruit_SH1106 show(OLED_RESET);
#outline ONE_WIRE_BUS 15 //Temp probe knowledge wire pin
OneWire oneWire(ONE_WIRE_BUS); //Inform OneWire which pin we're utilizing
DallasTemperature sensors(&oneWire); //OneWire reference to Dallas Temperature
void setup() {
show.start(SH1106_SWITCHCAPVCC, 0x3C);
show.clearDisplay();
sensors.start();
}
void loop() {
Show(); //Calls our show perform
}
void Show() {
show.clearDisplay();
int intTemp = Temp(); //Calls our Temp perform
show.setTextSize(3); //Units our textual content dimension
show.setTextColor(WHITE); //Units our textual content colour
show.setCursor(5, 5); //Units our textual content place on the show
show.print(intTemp); //Prints out the worth offered by the Temp perform
show.drawCircle(44, 7, 3, WHITE); //Attracts a level image
show.setCursor(50, 5);
show.print("C"); //Provides C to point that our temperature is in Celsius
}
int Temp() {
sensors.requestTemperatures(); // Ship the command to get temperatures
float tempC = sensors.getTempCByIndex(0); //This requests the temp in Celsius and assigns it to a float
int intTemp = (int) tempC; //This converts the float to an integer
if (tempC != DEVICE_DISCONNECTED_C) //Examine if our studying labored
{
return intTemp; //Return our temperature worth to the Show perform
}
}
Constructing a DIY Digital Thermometer
This challenge must be enjoyable and informative, whereas additionally providing you with the prospect to make a sensible merchandise. We now have designed this code to be so simple as potential, however you should utilize it as the inspiration for a extra difficult challenge as you be taught.
Learn Subsequent
About The Writer
