
There might be many explanation why you’d need to file audio in your iPhone and iPad. Whether or not you’re merely attempting to file a lecture, or singing a music to ship to your mates or family members. It may even simply be to file a random thought that you simply need to preserve a observe of. No matter your motivation, right here is how one can file audio on iPhone and iPad simply.
3 Methods to File Audio on iPhone and iPad (2022)
Each iOS and iPadOS include a built-in audio recording app known as “Voice Memos” that’s greater than succesful to allow you to file first rate high quality audio. With Voice Memo’s folders in addition to a handful of enhancing instruments, the app lets you organise and fine-tune your recordings.
For no matter motive, if Voice Memos doesn’t make the reduce for you, there are different notable options. To make sure you have extra viable choices to select from, now we have additionally introduced some top-notch audio recording apps for iOS into the fray.
Use Voice Memos to File Audio on iPhone and iPad
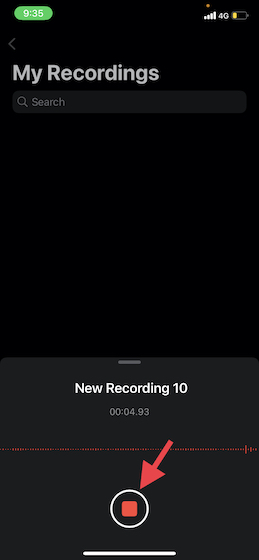
1. Open the Voice Memos app in your iPhone or iPad after which hit the file button to begin recording the audio.
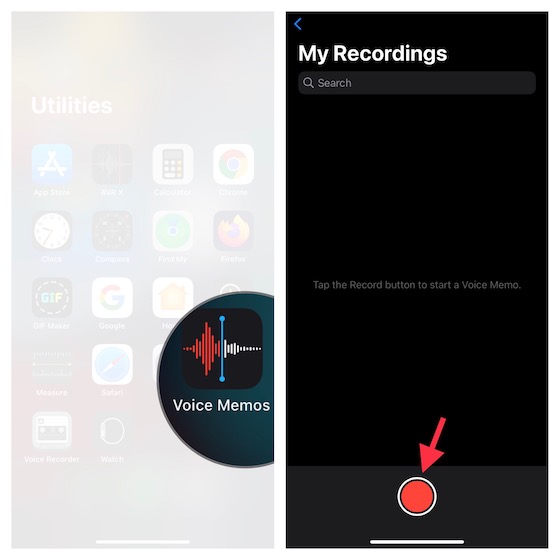
2. After getting recorded the audio, faucet the recording button to cease it. It’s as simple as it may ever get.
Word:
- Although Voice Memos names your audio recording based mostly in your present location, you’ll be able to select to disable location-based naming. To take action, head into the Settings app -> Voice Memos -> flip off the toggle for Location-Based mostly Naming. From now onwards, your memos will likely be named as “Recording 1, 2, 3” and many others.
- Do notice that every one your recordings can be found on each gadget that’s linked with the identical Apple ID.
- If you wish to allow/disable iCloud syncing for Voice Memos, head over Settings app -> profile -> iCloud -> after which flip off/on the toggle subsequent to Voice Memos relying in your wants.
Use Voice Memos to File Lossless Audio on iPhone and iPad
By default, the Voice Memos app information audio in a compressed format with the intention to save area in your iOS gadget. Whereas it is a fairly neat characteristic from the storage administration characteristic, it comes at the price of recording high quality. Should you don’t thoughts providing extra space to your recordings, I might advocate you turn to a lossless mode for max constancy.
1. Navigate to the Settings app in your iDevice -> Voice Memos.
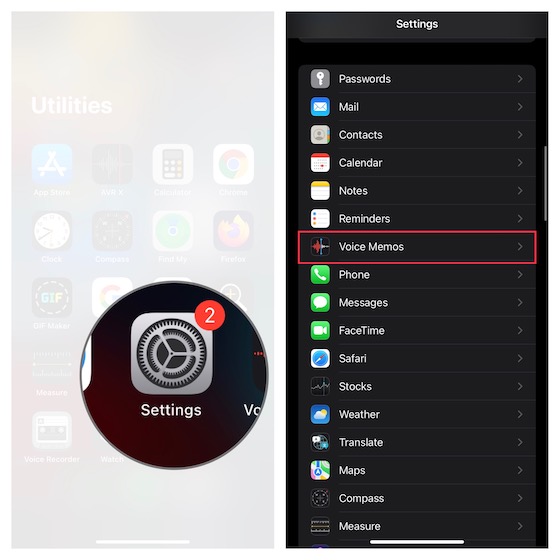
2. Now, faucet Audio High quality and select Lossless.
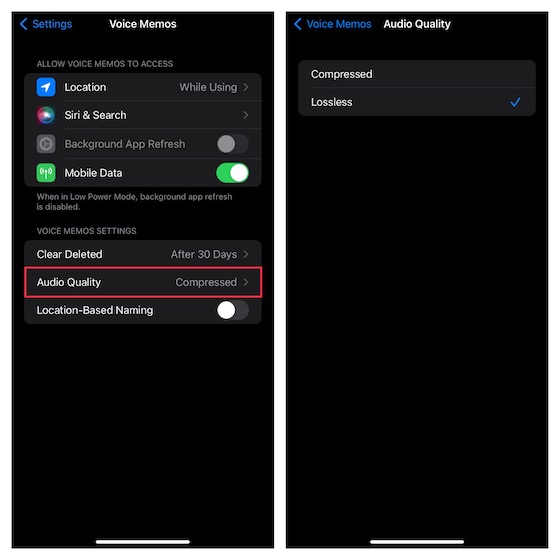
Going ahead, the Voice Memos app will allow you to file lossless audio in your iPhone or iPad.
Word: Keep in mind that recording in lossless high quality will take up significantly extra space in your iPhone, so solely use this you probably have loads of storage to spare.
Tips on how to Edit Voice Memos on iPhone and iPad
Let’s additionally check out how one can edit and improve voice memos in your iPhone and iPad.
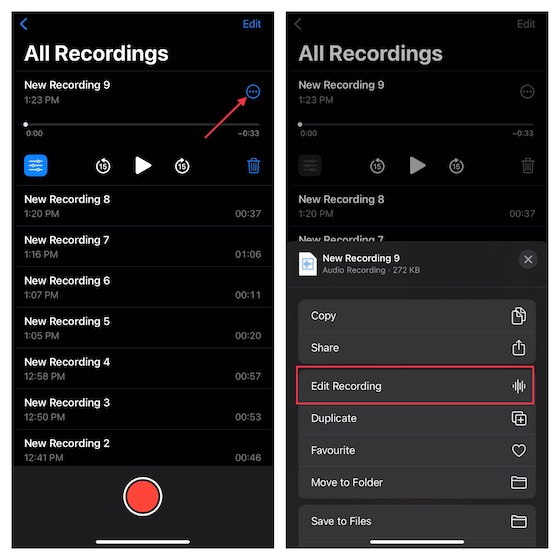
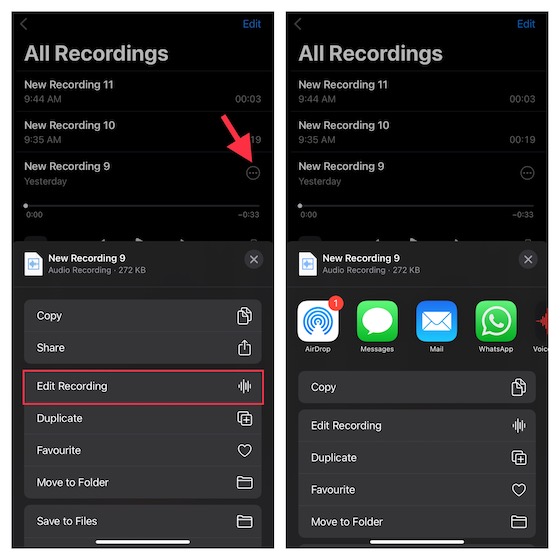
1. Launch Voice Memos app on iPhone or iPad -> head over to the recording you need to edit and choose it -> faucet the tiny circle proper subsequent to the recording and select Edit Recording within the menu.
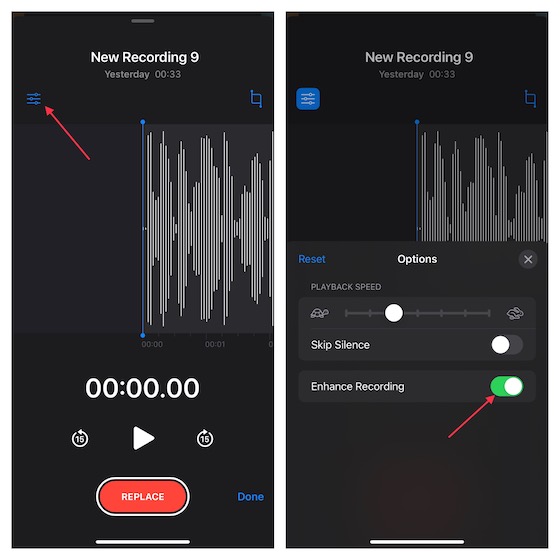
Improve Your Recording
- If you wish to enhance the audio high quality of your recording, faucet on the menu button (three tiny horizontal strains) on the prime left after which activate the toggle for Improve Recording.
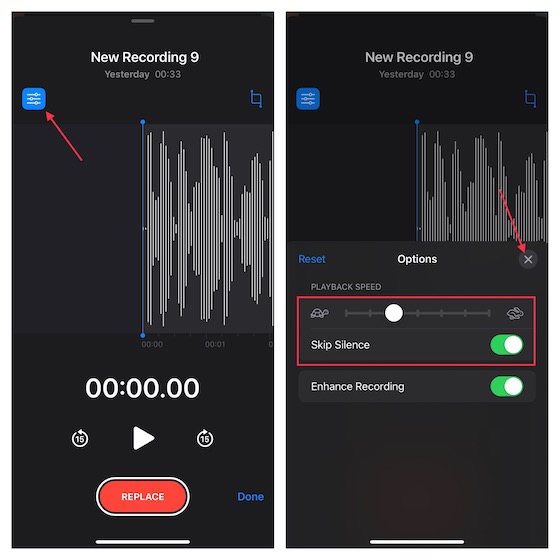
Regulate Playback Velocity of Your Audio Recording
- Faucet on the menu button on the prime left after which drag the playback pace slider to fine-tune the pace of your audio recording. It’s value mentioning that you simply even have the choice to skip silence. If you wish to eliminate silence, make it possible for the toggle subsequent to Skip Silence is turned on. If you find yourself happy with the outcome, faucet the “X” button to cover the enhancing menu.
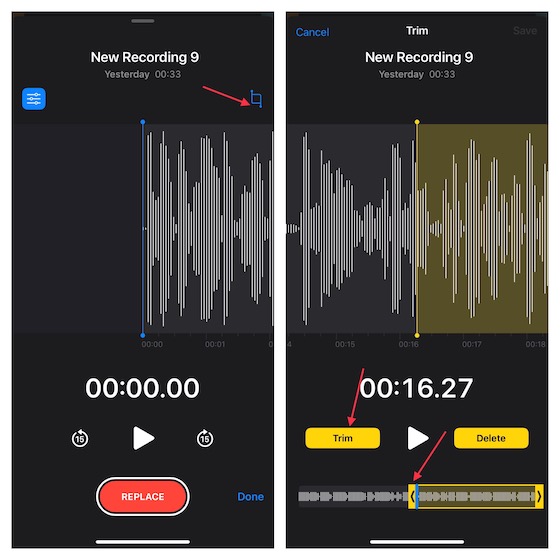
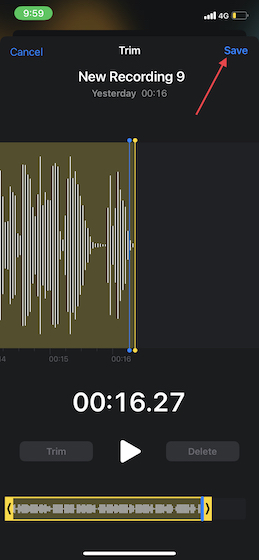
Take away Undesirable Half from Your Recording
- Faucet on the crop button after which use the deal with to pick out the portion you need to preserve. Then, hit Trim to eliminate the undesirable half.
2. Ultimately, make certain to faucet on Save to verify the modifications.
Share Voice Recording from iPhone and iPad
Sharing voice recordings from iPhone and iPad is sort of simple.
1. Open the Voice Memos app in your iPhone or iPad and head over to the recording that you simply need to share.
2. Now, choose the recording after which faucet on the circle with three dots. After that, faucet Share within the menu after which select the popular medium to share the recording within the share sheet.
File Audio on iPhone and iPad with Display Recorder
Occasions when chances are you’ll need to information anybody by a video, the native display recorder can are available tremendous helpful. Aside from letting you file the display, it additionally provides the pliability to file the audio. You’ll be able to make the most of this great tool to create nifty tutorials to share or connect to your presentation.
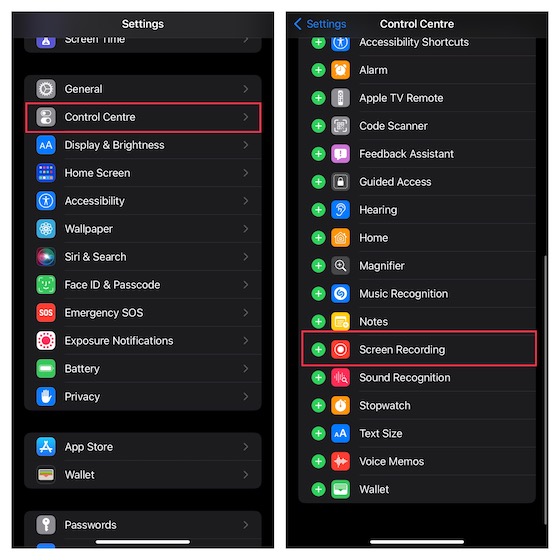
1. Go to the Settings app in your iPhone/iPad -> Management Middle. Now, faucet the “+” button to the left of the Display Recording icon so as to add it to the management heart.
2. Now, swipe down from the highest proper nook of the display (on iPhone/iPad with out house button) or swipe up from the underside fringe of the display (on iPhone/iPad with house button). After that, contact and maintain the display recording icon and faucet the Microphone icon to show it on. Then, hit Begin Recording within the menu.
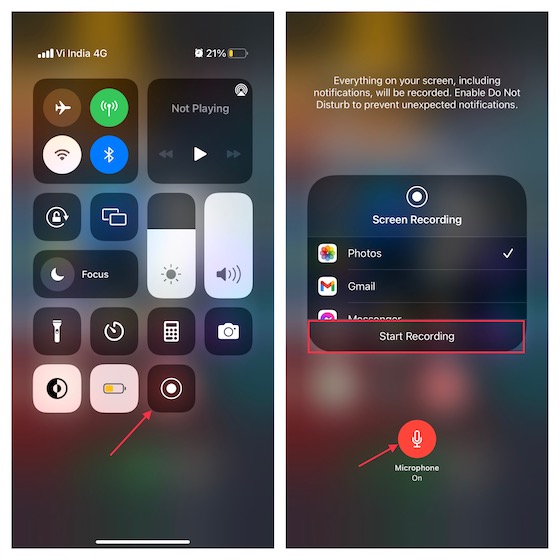
3. After getting recorded the display, faucet the pink button on the prime left nook of the display and hit Cease within the popup menu to verify.
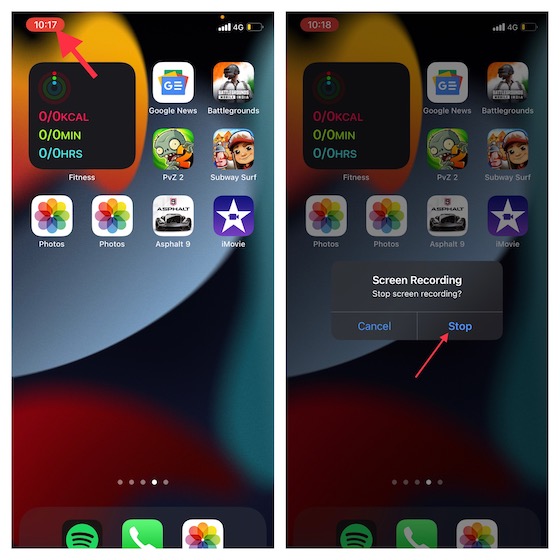
Your display recording will likely be saved within the Images app.
Finest Third-Occasion Audio Recorders for iPhone and iPad
Should you want extra succesful audio recording apps in your iOS gadget, we’ve obtained you coated with the three greatest options. These apps are easy-to-use and include environment friendly enhancing instruments to allow you to enhance the audio high quality. Furthermore, in addition they can help you handle your recordings and share them with ease.
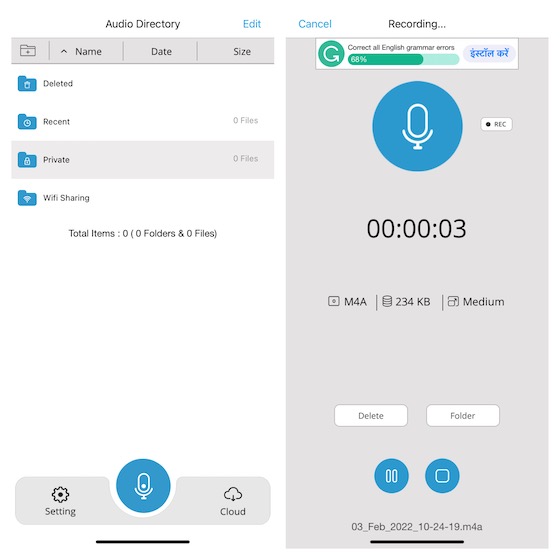
1. Audio Recorder HD & Voice Memos
In case you are searching for an audio recorder that may allow you to file audio in a number of codecs together with WAV, M4A, AAC, MP4, CAF, and MP3, this one might be value trying out. The app options an intuitive interface and lets you file audio in three completely different qualities equivalent to low, medium, and excessive. What’s extra, it’s built-in with many cloud companies like Field, Dropbox, Google Drive, and extra to allow you to import and export audio to your most popular cloud service with ease.
Set up: (free, full-version is obtainable for $5)
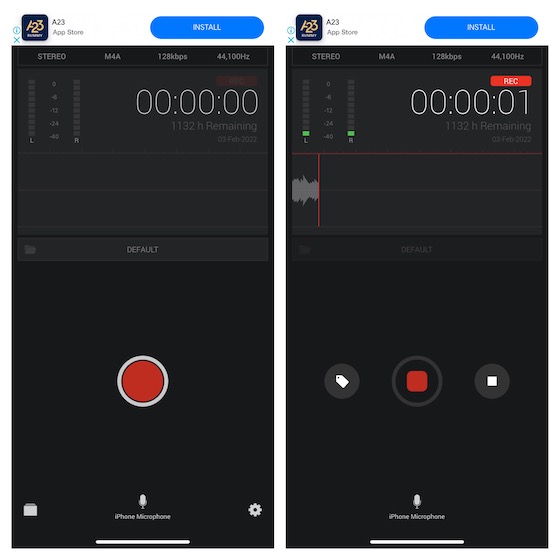
2. AVR X – Voice Recorder
AVR X is a pro-grade audio recording app that you should use to file audio in a number of codecs equivalent to MP3, WAV, and M4A. Furthermore, it additionally helps numerous audio high quality choices and comes with a bunch of proficient audio enhancing instruments to allow you to improve your audio. Mix that with user-friendly options like folder administration, audio visualization in addition to easy file-sharing performance and AVR X appears to be very laborious to beat. In a nutshell, it’s probably the greatest free audio recording apps for iPhone and iPad.
Set up: (free)
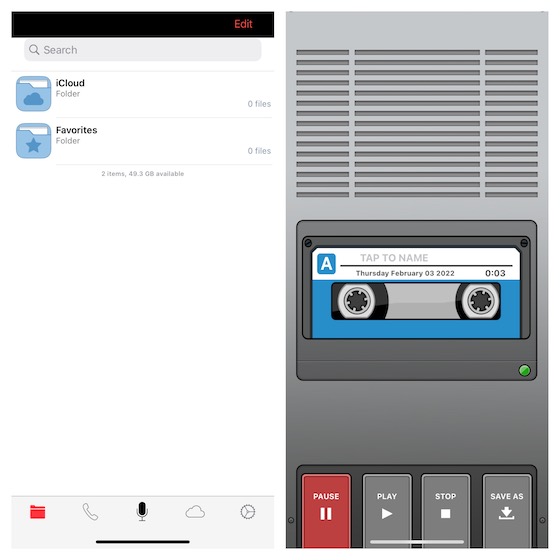
3. Voice Recorder & Audio Recorder
Final however not least, “Voice Recorder & Audio Recorder” is on top of things for high-quality audio recording. With all of the important enhancing instruments, The app additionally enables you to edit your audio in order that it may sound higher. The mixing with a number of cloud companies equivalent to iCloud Drive, Google Drive, and OneDrive lets you securely again up your recordings and preserve them accessible throughout units. After getting enhanced your recording, you’ll be able to share it by electronic mail, WhatsApp, Fb, Twitter, and Snapchat. On prime of all, it additionally lets you transcribe recordings utilizing text-to-speech know-how and file calls (requires in-app purchases)
Set up: (free, TapMediaPro is obtainable for $2/month)
A number of Methods to File Audio on iPhone and iPad
That’s all there may be to it! I hope you may have discovered the suitable audio recorder in your iOS/iPadOS gadget. As I stated above, the inventory audio recording app could be very succesful to stay as much as the duty. Nonetheless, if you should file audio in a number of codecs and need to edit it with higher management, the above-mentioned third-party apps can do the job for you. By the way in which, do you may have any inquiries to ask or suggestions to share? If sure, ship it throughout through the feedback part under.