In case you’ve bought loads of apps and packages put in on Home windows 10 or 11, you would possibly wish to transfer them to a different drive to liberate area. It could even be vital to vary your default set up location. Fortunately, all of these items are potential.
Home windows has a built-in utility that permits you to transfer fashionable apps to a location of your alternative. Though this methodology does not work for conventional desktop packages, it is nonetheless potential to maneuver these packages to a different drive.
Allow us to present you find out how to transfer an app or program to a different drive on Home windows 10 and Home windows 11.
The way to Transfer Apps and Applications to One other Drive on Home windows 10 and 11
The method that you must comply with depends upon what you wish to transfer to a different drive—whether or not it is a native Home windows 10/11 app or a third-party program.
First, we’ll define the method for Microsoft Retailer apps, then we are going to check out conventional desktop packages.
The way to Transfer Home windows 10/11 Apps to One other Drive
This methodology will solely work for apps that you’ve got put in from the Microsoft Retailer.
- Press Home windows key + I to open Settings.
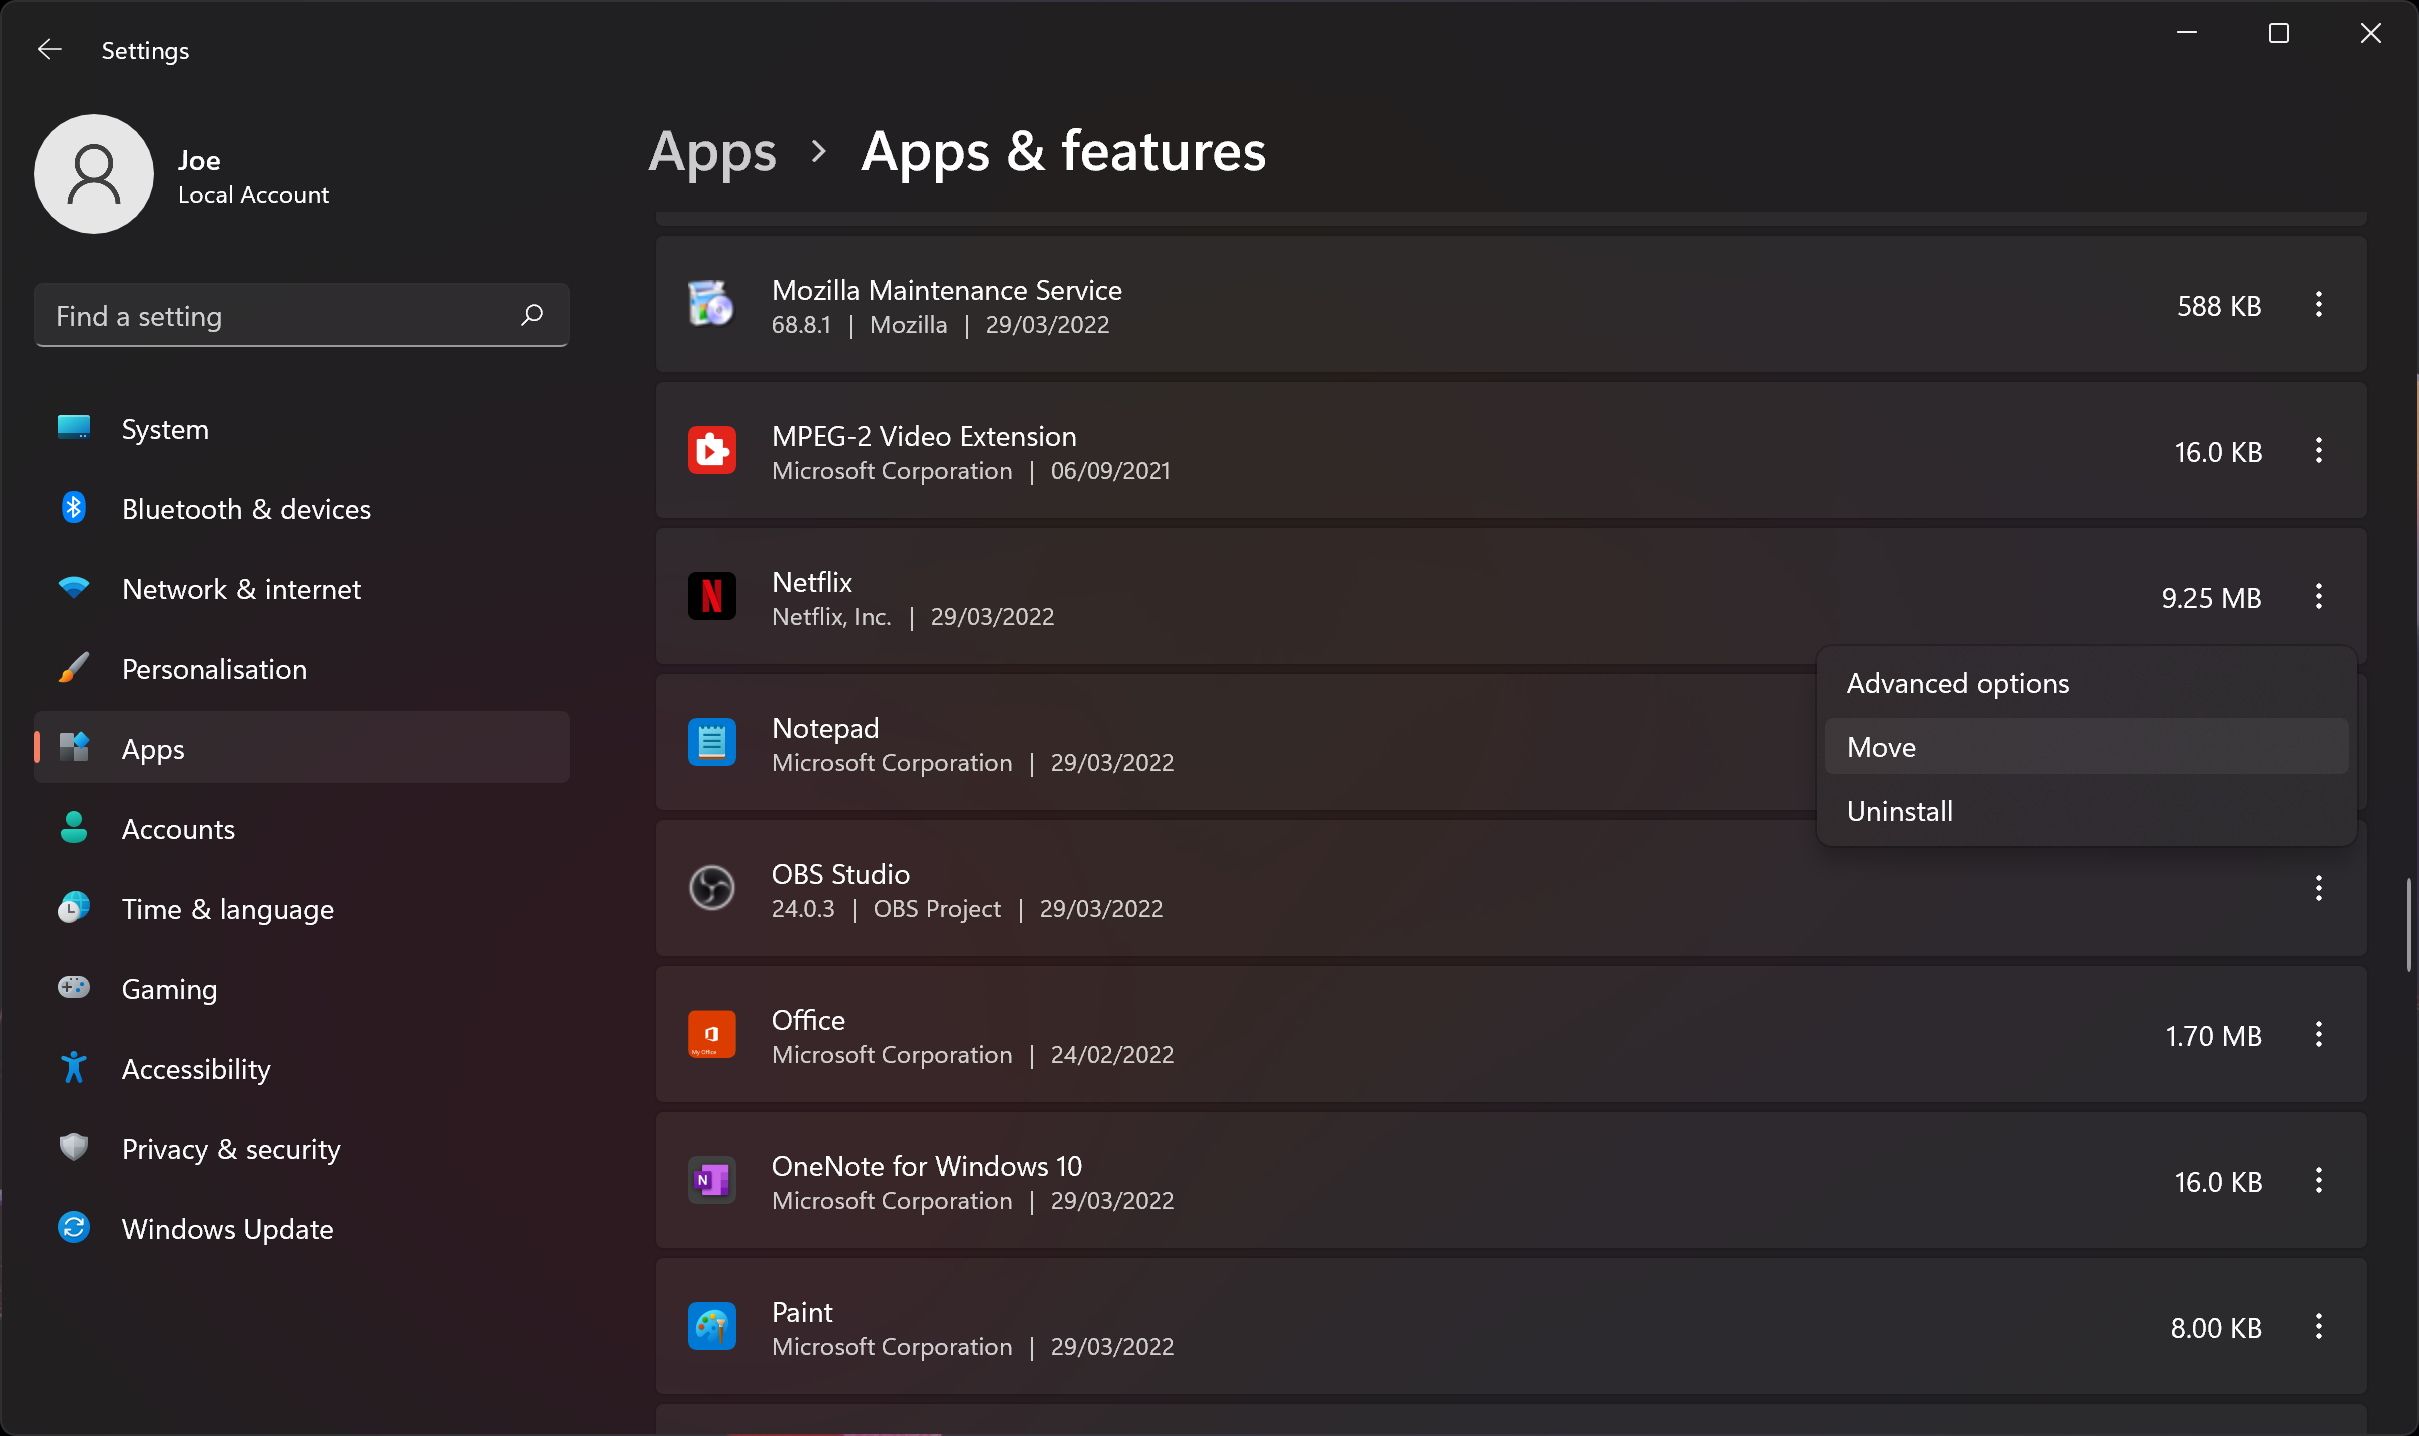
- Click on Apps > Apps & options. Right here you will see an inventory of all apps and packages put in in your system.
- Scroll to the app that you just wish to transfer.
- On Home windows 10, choose the app from the listing.
- On Home windows 11, click on the three vertical dots.
- Click on Transfer.
- Choose the brand new drive from the dropdown.
- Click on Transfer once more.
You possibly can repeat this course of if you wish to transfer the app again or to a distinct drive.
If the Transfer button is greyed out, it means it is a Home windows 10/11 app that may’t be moved (you possibly can uninstall pointless Home windows apps). In case you see a Modify button as an alternative, it is a conventional desktop program, and you may must comply with the strategy outlined under.
The way to Transfer Desktop Applications to One other Drive
Microsoft does not suggest shifting the put in packages’ file location as a result of it may trigger points, like this system not working or knowledge loss. A safer, albeit much less environment friendly, methodology is to uninstall this system and reinstall it to your required drive.
If you wish to proceed, create a Home windows restore level to reverse the adjustments if something goes incorrect.
We suggest utilizing a program referred to as Steam Mover. This was initially designed to maneuver Steam video games between drives however will really work on any program.
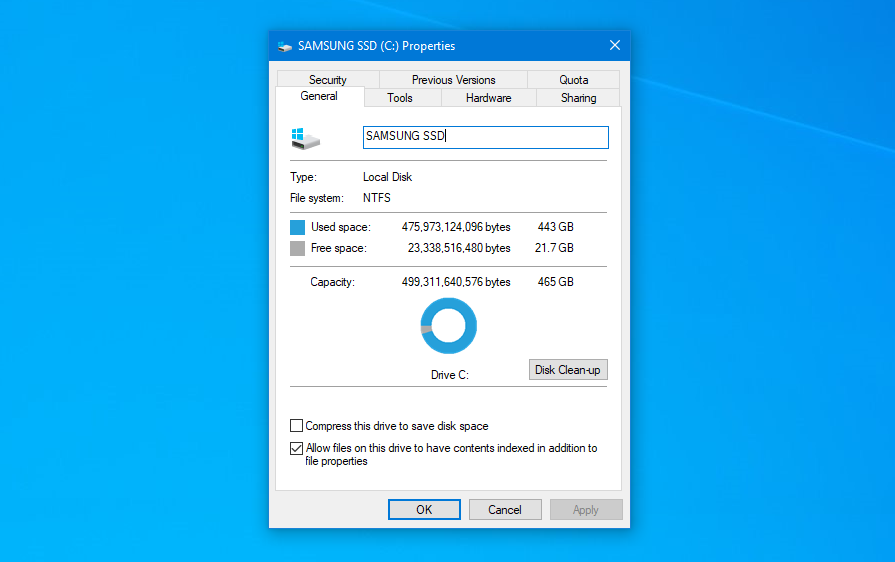
Whether or not it is the place the put in program at present sits or the place you need it moved to, any drive that you just wish to use with this program must be within the NTFS format. To test this:
- Press Home windows key + E to open Home windows Explorer, then navigate to This PC.
- Proper-click a drive and click on Properties.
- Confer with the File system to see if it is NTFS.
With that confirmed, now you can use Steam Mover to maneuver your packages from one drive to a different:
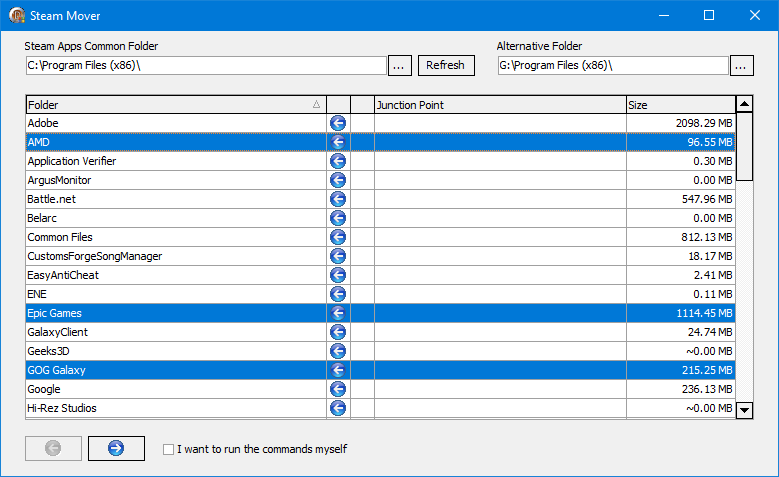
- Open Steam Mover.
- Subsequent to Steams Apps Frequent Folder, click on the three-period button to pick out the folder path on the drive containing the packages you wish to transfer (for instance, your Program Information on the C drive).
- Subsequent to Various Folder, click on the three-period button to pick out the drive and folder path the place you wish to transfer this system to.
- Choose this system from the listing that you just wish to transfer. You possibly can choose a number of packages by holding Ctrl as you click on.
- When prepared to maneuver, click on the proper arrow on the backside to start. Command Immediate will open and course of the transfer.
- When full, you will see the brand new folder path subsequent to this system within the Junction Level column.
The way to Change the Default Set up Path of Apps and Applications on Home windows 10 and 11
In case you simply wish to change the default set up location on Home windows 10 or Home windows 11, that is easy. In case you’re on Home windows 8 or prior, you want a third-party program.
The way to Change the Default Set up Path on Home windows 10/11
- Press the Home windows Key + I to open Settings.
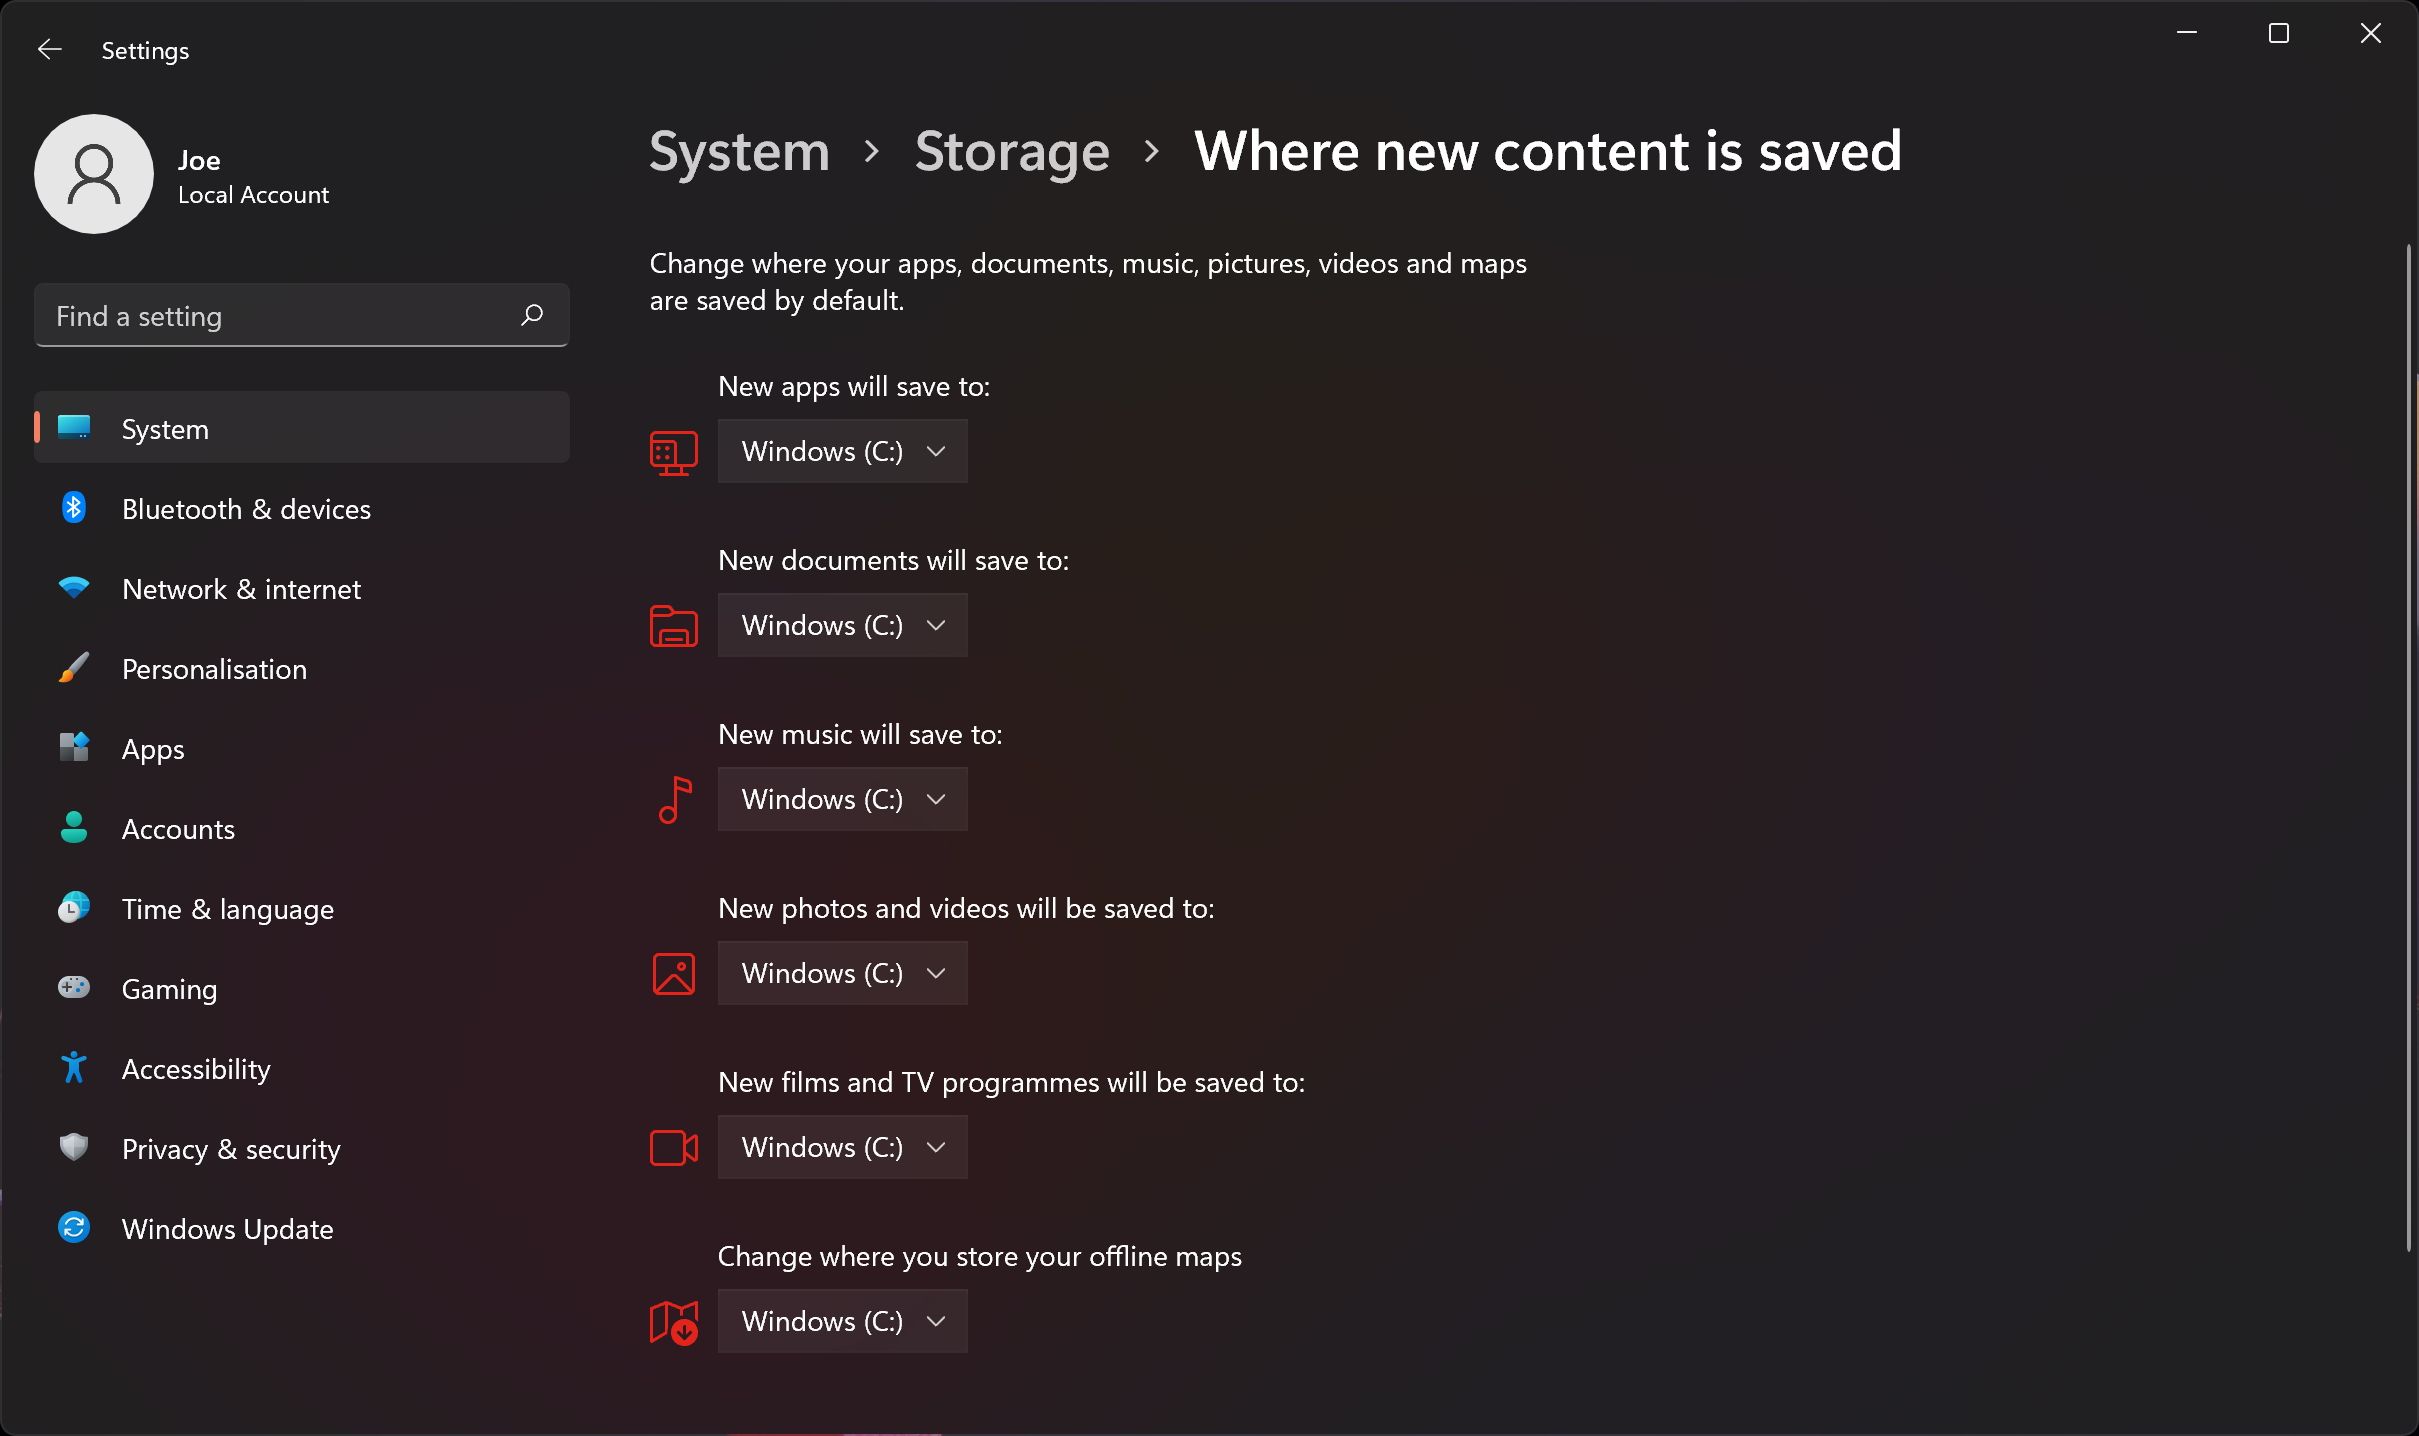
- Click on System > Storage.
- On Home windows 10, beneath the Extra storage settings heading, click on Change the place new content material is saved.
- On Home windows 11, click on Superior storage settings > The place new content material is saved.
- To alter the default drive for brand spanking new apps, use the New apps will save to dropdown.
You’ll discover that this web page additionally permits you to change the default location of issues like paperwork, music, and footage.
The way to Change the Default Set up Path on Home windows 8 and Prior
Microsoft does not suggest altering the default set up path for packages. Doing so may trigger issues with current packages and a few Home windows options. It is best to carry out this operation on a clear system. If that is not appropriate, create a restore level in an effort to roll again if vital.
Nearly all of packages will allow you to change the set up path when putting in them. It is a minor inconvenience to do that every time, maybe, nevertheless it requires no system change.
In case you do wish to proceed, use a program referred to as Install Dir Changer. Obtain it from SourceForge after which run this system:
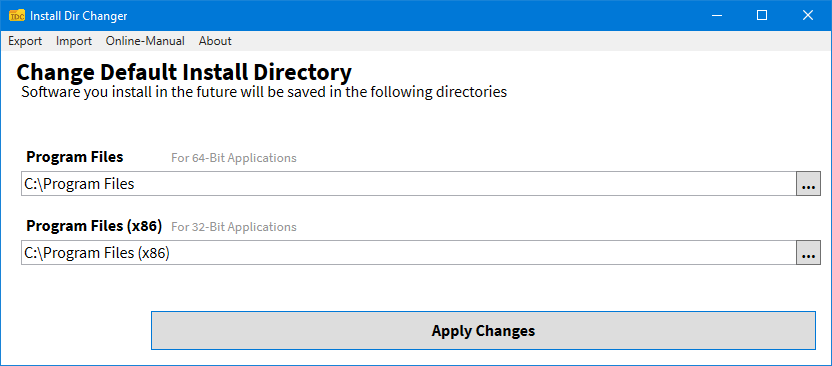
- Click on Allow Enhancing after which click on Sure when the Consumer Account Management window pops up.
- You possibly can set a distinct path for 64-bit purposes and 32-bit purposes. To set the default set up path for every, click on the three-period button to browse to a folder path.
- As soon as you’ve got chosen your new path, click on Apply Modifications. Now, all new packages you put in will default to those folder paths.
Free Up Disk House on Your Drive
Now that you understand how to maneuver your apps and packages and find out how to change their default set up location, you possibly can liberate area in your drives. However keep in mind to take all precautions when utilizing third-party packages.
If you wish to salvage much more disk area, contemplate deleting previous Home windows information and folders. Together with having moved your packages to a different drive, you will have a wonderfully organized drive.
Learn Subsequent
About The Creator
