In 2011, Twitter launched the Bootstrap framework. Since then, this CSS framework has seen two main rewrites, with the latest one (Bootstrap 3) launched in 2013. Bootstrap 3 reworked the CSS library by implementing a mobile-first strategy that left the framework fully responsive.
As of 2022, Bootstrap is at model 5 and is without doubt one of the hottest frontend frameworks. It has an in depth listing of prebuilt elements and a powerful assortment of JavaScript plugins. On this article, you’ll discover ways to use Bootstrap and benefit from its options.
Putting in Bootstrap in Your Venture
There are 3 ways to make use of Bootstrap in your challenge. You’ll be able to obtain and host the CSS and JavaScript recordsdata, set up it in your challenge utilizing npm, or copy and paste the suitable cdn hyperlinks in your challenge.
With the cdn strategy, you should keep in mind to put the Bootstrap hyperlink earlier than some other CSS hyperlink within the head tag of your HTML file.
Some Bootstrap elements have practical actions, corresponding to button toggling and positioning that requires the importation of JavaScript and Popper script. So, in case you intend to make the most of any practical elements, you’ll want so as to add the script tag to your HTML file as nicely.
The ultimate factor you should begin utilizing Bootstrap is the viewport <meta> tag.
The Viewport Meta Tag
<meta title="viewport" content material="width=device-width, initial-scale=1">
Since Bootstrap is a mobile-first know-how, the viewport <meta> tag will help in responsive design. A easy manner to make use of bootstrap in your challenge is to only copy Bootstrap’s starter template.
Making a Web site With Bootstrap
While you’re creating a brand new web site, one of many first issues you should think about is the structure. After that, you may transfer to different elements like buttons and typography.
Bootstrap has a group of structural elements that you need to use to prepare parts on an internet web page. These structure constructions embody:
- Containers
- Grid
- Columns
- Gutters
- Breakpoints
Utilizing a barely altered model of the Bootstrap starter template, you can begin outlining the construction of your webpage and add new elements.
The index.html File
<!doctype html>
<html lang="en">
<head>
<!-- Required meta tags -->
<meta charset="utf-8">
<meta title="viewport" content material="width=device-width, initial-scale=1"><!-- Bootstrap CSS -->
<hyperlink href="https://cdn.jsdelivr.internet/npm/bootstrap@5.1.3/dist/css/bootstrap.min.css" rel="stylesheet" integrity="sha384-1BmE4kWBq78iYhFldvKuhfTAU6auU8tT94WrHftjDbrCEXSU1oBoqyl2QvZ6jIW3" crossorigin="nameless">
<title>Bootstrap</title>
</head>
<physique>
<!-- Separate Popper and Bootstrap JS -->
<script src="https://cdn.jsdelivr.internet/npm/@popperjs/core@2.10.2/dist/umd/popper.min.js" integrity="sha384-7+zCNj/IqJ95wo16oMtfsKbZ9ccEh31eOz1HGyDuCQ6wgnyJNSYdrPa03rtR1zdB" crossorigin="nameless"></script>
<script src="https://cdn.jsdelivr.internet/npm/bootstrap@5.1.3/dist/js/bootstrap.min.js" integrity="sha384-QJHtvGhmr9XOIpI6YVutG+2QOK9T+ZnN4kzFN1RtK3zEFEIsxhlmWl5/YESvpZ13" crossorigin="nameless"></script>
</physique>
</html>
The Bootstrap Container Class
The Bootstrap container class pads, incorporates, and aligns the weather in your webpage. In case you plan to make use of Bootstrap’s default grid, then you definitely’ll must additionally use Bootstrap’s container class. There are three forms of container lessons; container, container-fluid, and container-{breakpoint}. The container class is the default container; it’s responsive and has a fix-width at every of Bootstraps six breakpoints.
Bootstrap’s six default breakpoints contains:
- Further Small: Lower than 576px.
- Small: Better than or equal to 576px.
- Medium: Better than or equal to 768px.
- Giant: Better than or equal to 992px.
- X-Giant: Bigger than or equal to 1200px.
- XX-Giant: Larger than or equal to 1400px.
To make use of Bootstrap’s container in your challenge, you may merely add the specified container class to the exterior div in your webpage.
Utilizing Bootstrap’s Container
<div class="container">
<!-- place web site parts right here --></div>
Inserting the code above within the physique of your current HTML file will make your webpage responsive, and it’ll additionally create padding on either side of your webpage.
The Bootstrap Grid System
Bootstrap’s grid makes use of a twelve-column system that depends on the row and col grid lessons, in addition to the container class. Every row has twelve columns, and any aspect can span throughout a number of of those columns. The column class will point out what number of columns a component ought to occupy. For instance, a component utilizing the col-2 class will span throughout two columns, a component utilizing the col-3 class will span throughout three columns, and so forth.
The Bootstrap grid system relies on the flexbox module. If solely two columns occupy a row, they’ll divide the area equally amongst themselves. The gutter class is considered one of Bootstrap’s structural parts, and it controls the spacing between every column within the grid system. Every grid column has 12px of padding on both facet.
Utilizing Bootstrap’s Grid System
 <nav class="row">
<!-- navbar -->
<h2>Navigation Bar</h2>
</nav>
<div class="row" id="webpage-body">
<article class="col" id="main-content">
<!-- most important content material on a webpage-->
<h1> Article </h1>
<p>
Lorem ipsum, dolor sit amet consectetur adipisicing elit. Dolorem porro non quae
obcaecati illo laboriosam a, voluptate molestias eum velit, distinctio impedit
ratione facere numquam, optio eligendi delectus cumque quos.
</p>
</article>
<apart class="col-sm-4">
<!-- sidebar -->
<h3> Associated Article </h3>
<h3> Associated Article </h3>
<h3> Associated Article </h3>
<h3> Associated Article </h3>
</apart>
</div>
<footer class="row">
<!-- footer -->
<h2>Footer</h2>
</footer>
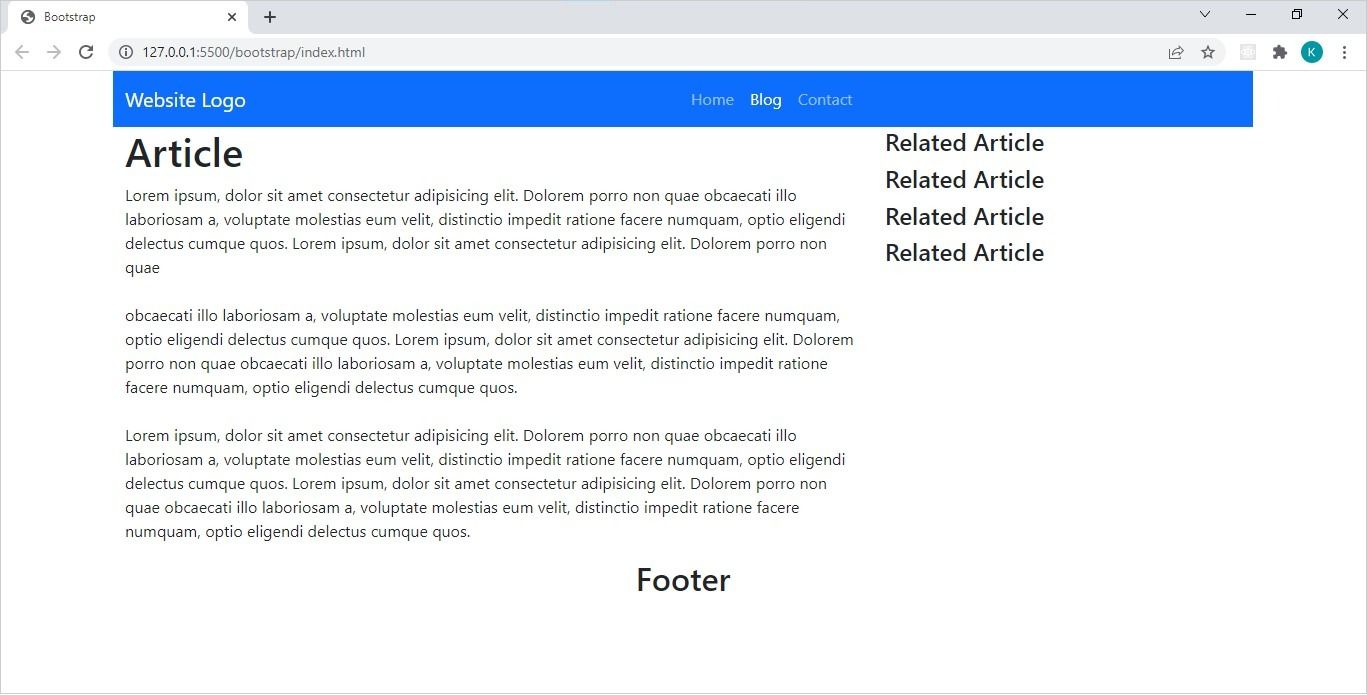
Inserting the code above into the container div will create a Bootstrap grid system of three rows and two columns. The primary row on the prime will maintain the navbar, the third row on the backside will maintain the web site footer, and the second row within the center will maintain the content material of the webpage. The second row has two columns—the primary article and an apart.
Creating an area CSS file and including a border to every part of the grid will permit you to see it extra clearly.
The fashion.css File
.row{
border: 2px blue stable;
}
.col, .col-sm-4{
border: 2px pink stable;
}
Linking to the CSS file above will create the next output in your browser:

An apparent distinction within the picture above is the scale of the columns. Often, two (or extra) columns in a row occupy the identical quantity of area except you explicitly state in any other case. The col-sm-4 class within the HTML code above ensures that the second column solely spans over 4 of the twelve columns within the row. The sm within the col-sm-4 class represents the small breakpoint, so, the apart part will solely occupy 4 columns from the small breakpoint and above.
Bootstrap Elements
After you’ve selected the structure of your webpage the following step is so as to add web site constructing parts, which Bootstrap calls elements. Bootstrap’s listing of elements embody:
- Navbar
- Buttons
- Button group
- Checklist group
- Playing cards
- Collapse
- Dropdowns
Each Bootstrap navigation bar requires the navbar class. In addition they require using the <nav> tag or assigning the “navigation” key phrase to the Bootstrap function attribute within the navbar’s father or mother div. To make the navbar responsive you’ll want to make use of the collapse JavaScript plugin.
The Bootstrap navbar class makes use of an aria-current attribute that takes the “web page” worth to point the present web page, or “true” to point the present part of a webpage. The worth you assign will rely on the construction of your web site (single web page or a number of pages). You also needs to use the energetic class to point the present web page or part.
<nav class="row navbar navbar-dark bg-primary navbar-expand-lg">
<div class="container-fluid">
<div class="col">
<a category="navbar-brand" href="#">Web site Emblem</a>
</div>
<button class="navbar-toggler" kind="button" data-bs-toggle="collapse" data-bs-target="#navbarSupportedContent" aria-controls="navbarSupportedContent" aria-expanded="false" aria-label="Toggle navigation">
<span class="navbar-toggler-icon"></span>
</button>
<div class=" col collapse navbar-collapse" id="navbarNav">
<ul class="navbar-nav">
<li class="nav-item">
<a category="nav-link " href="#">House</a>
</li>
<li class="nav-item">
<a category="nav-link energetic" aria-current="web page" href="#">Weblog</a>
</li>
<li class="nav-item">
<a category="nav-link" href="#">Contact</a>
</li>
</ul>
</div>
</div>
</nav>
Changing the navigation row of the Bootstrap grid with the code above will create the next output in your browser:
There are a number of different essential lessons and Bootstrap attributes within the code above, such because the navbar-brand class, which targets the emblem part of your navbar. The navbar can also be fully responsive due to the collapse JavaScript plugin.
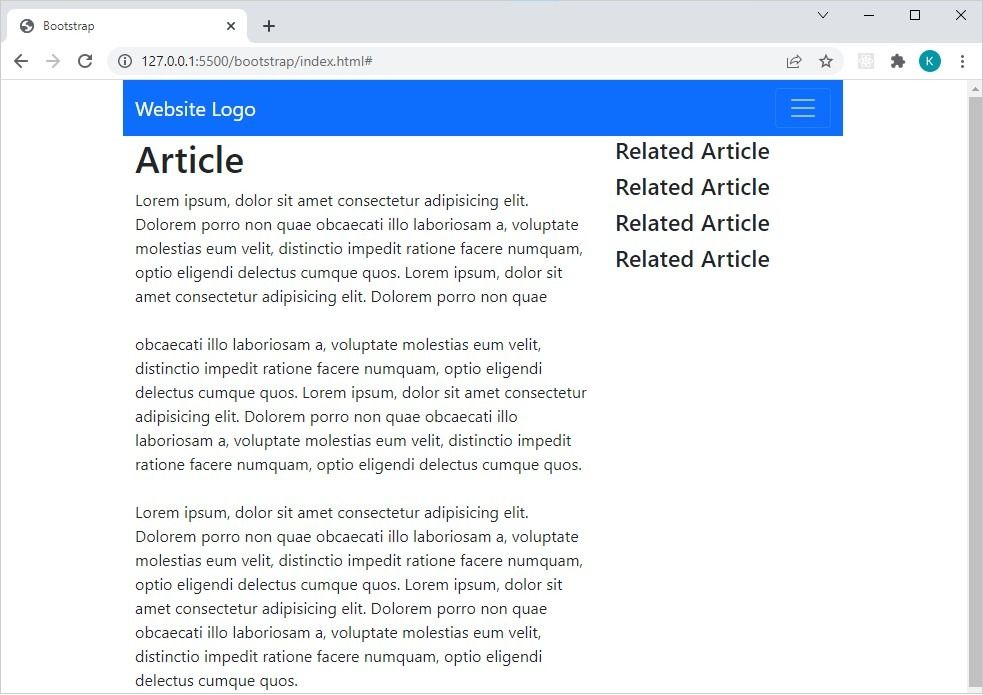
You might recall that Bootstrap has six default breakpoints and a kind of breakpoint is giant (lg). The navbar-expand-lg class within the <nav> tag above expands right into a horizontal listing of navigation gadgets on the giant breakpoint and above, and that listing reverts to a button at any breakpoint under giant.
If you wish to study extra about creating responsive web sites, we have put collectively a chunk outlining how to do that with media queries in HTML and CSS.
The Bootstrap Button Element
The Bootstrap button element makes use of the <button> tag and requires that you simply set the kind attribute to “button”.
Bootstrap has a number of forms of buttons. To create the extra standard button you’d use the btn class, however to create a hamburger button like within the code above you’d use the navbar-toggle class.
When Ought to You Use Bootstrap?
Bootstrap is named one of many extra fashionable CSS frameworks as a result of it’s a trailblazer. Lengthy earlier than responsive design was so commonplace in software program improvement, Bootstrap reworked itself into a very responsive framework.
Over time, Bootstrap has continued to advance and enhance, making it the primary alternative for prime corporations, corresponding to Twitter and Spotify. Nonetheless, it is not going to all the time be the most suitable choice in your software program improvement wants. For instance, in case you’re making a React software there’s a design system referred to as MUI that’s personalized for React purposes.
Learn Subsequent
About The Writer
