Like different desktop purposes, Skype can also be prone to glitches. Some widespread points embrace audio calls failing to perform, your calls dropping randomly, communication delays over the audio name, or incoming calls turning into unreachable.
Equally, you might even see Skype audio utterly muted. Consequently, you will be unable to listen to something on Skype. These points typically stem from an working system downside, however there are occasions when the app itself or audio peripherals may also be guilty.
If Skype audio is not working otherwise you’re going through points with it, we’ll talk about a number of fixes that may restore Skype audio.
1. Make sure the Difficulty Is not on the Backend
Earlier than implementing any fixes, it’s crucial to make sure that the problem is not coming from Skype’s backend. To verify this, go to the Skype status page and examine the standing of all Skype features.
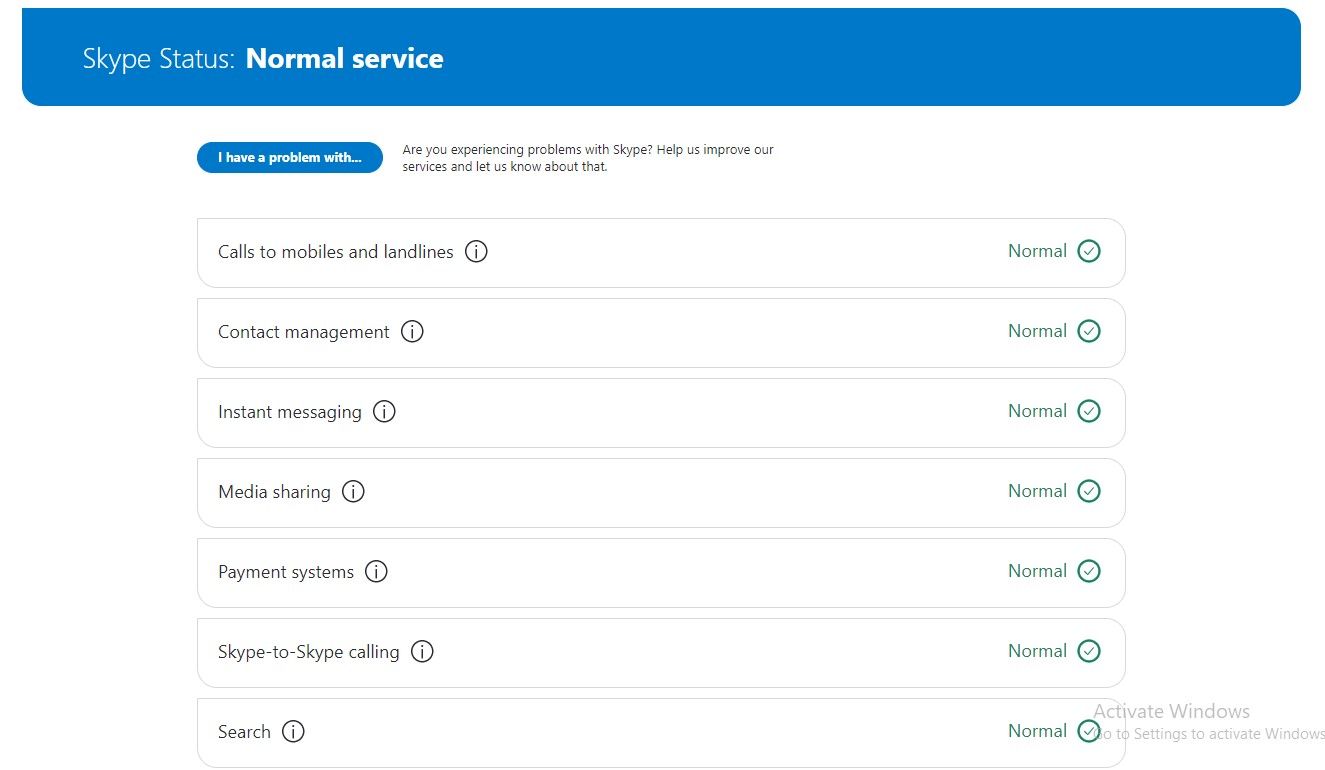
If any of the options associated to audio aren’t regular, then there may very well be an issue with the backend. On this case, the one factor you are able to do is wait till Microsoft resolves the problem.
As well as, to see real-time issues or outages reported by different customers, go to the Down Detector’s official website and enter Skype. If the down detector web site doesn’t present outages and every thing is normally working, the problem lies elsewhere.
2. Make sure the Audio Gadgets Are Accurately Chosen
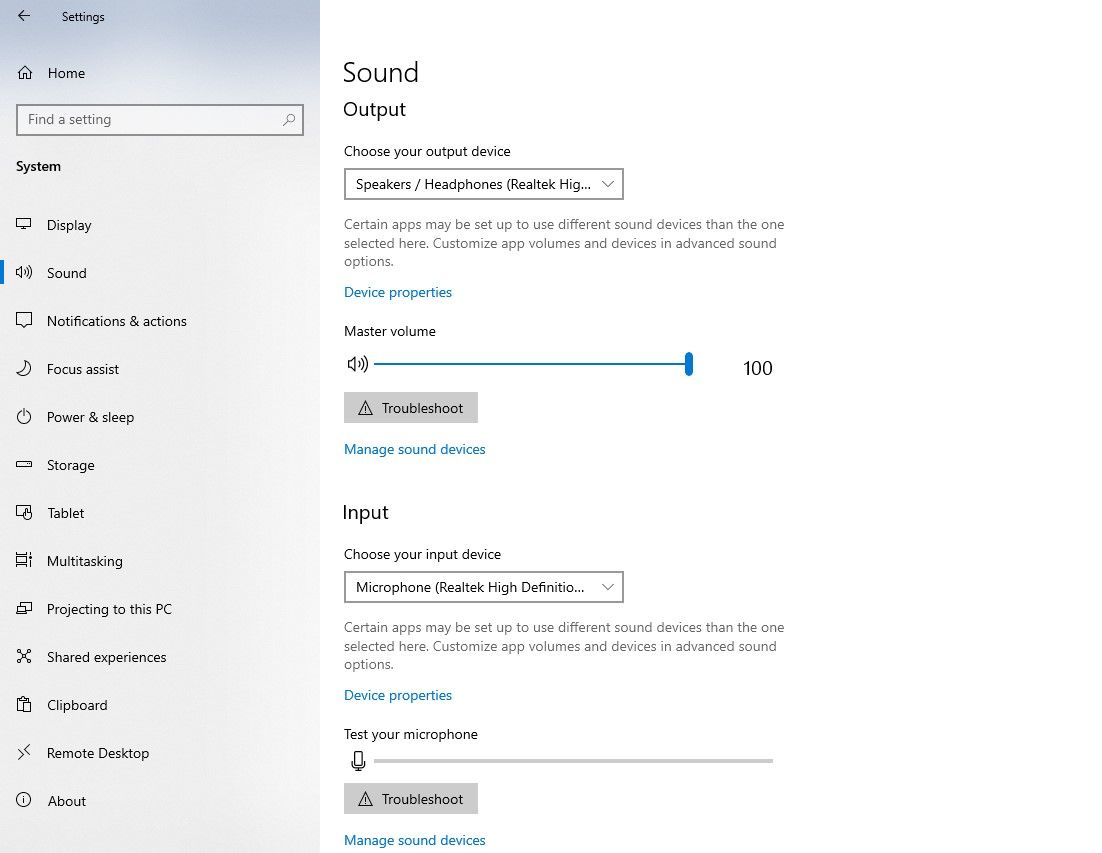
After verifying that Skype is functioning usually, it’s best to make sure the audio gadgets you are presently utilizing in Home windows are accurately chosen.
You could be utilizing one enter or output audio gadget whereas another gadgets are chosen in Home windows as defaults. It’s crucial to rule this risk out.
Comply with these steps to take action:
- Open the Home windows Settings app.
- Navigate to the System settings.
- Within the left-sidebar, choose Sound.
- Be sure that the correct enter and output sound gadgets are chosen.
There is no such thing as a hurt in working the troubleshooter (positioned below every kind of gadget) to diagnose the issue. When troubleshooters elevate their arms, be sure your microphone is accessible to the app.
Make sure the Skype App Has Entry to Your Microphone
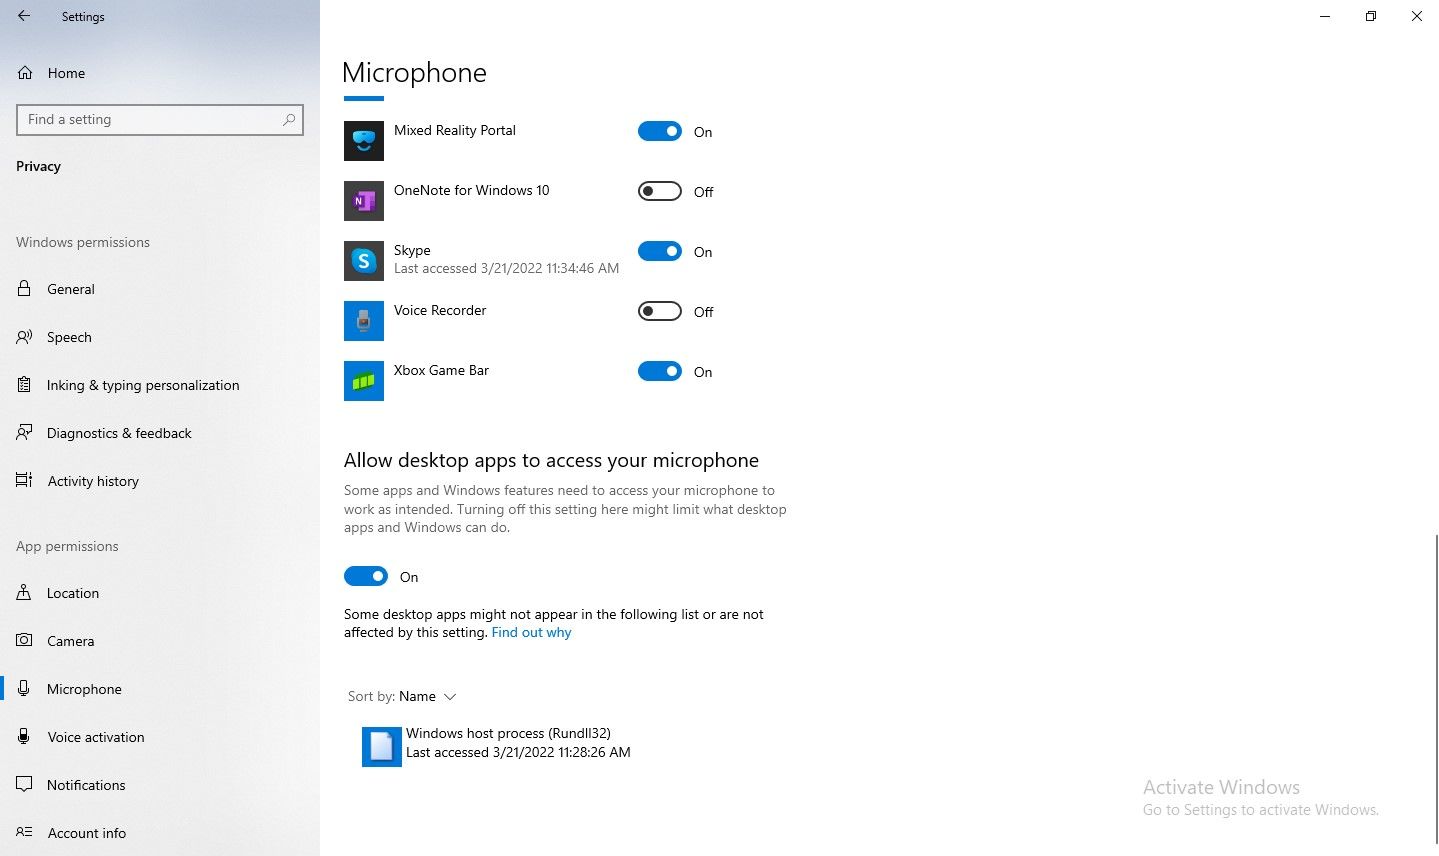
In case you’re having difficulties utilizing your Skype microphone, be sure the app does not have its permissions restricted in Home windows settings.
To do this, open the Home windows Settings app and go to the Privateness settings. On the left sidebar, choose Microphone below App Permissions. To make sure Skype can entry your microphone, be sure the toggle for Skype is turned on.
Following choosing right audio gadgets within the settings, it’s essential to rule out {hardware} issues.
3. Rule Out {Hardware} Points
Be certain that your audio {hardware} is not the issue earlier than troubleshooting different software program points. Whereas troubleshooting {hardware} points, do the next issues first:
- Reconnect the audio {hardware}.
- Verify for potential bodily injury.
- Be sure that the {hardware} cable and ports are intact.
- Join your gadgets to the completely different ports in your laptop.
- Strive one other pair of headphones and play audio by them.
After finishing the fundamental checks, play audio in one other app by the identical {hardware} to make sure the problem is just not system-level quite than Skype-specific. If the problem pertains to the {hardware}, troubleshoot the microphone situation and get one other pair of headphones to confirm it.
In circumstances the place the identical audio {hardware} performs audio for different apps and browsers, it ensures the issue lies completely with Skype. In that case, it’s best to subsequent modify Skype’s audio settings.
4. Tweak Skype’s Audio Settings
To alter Skype’s audio settings, observe these steps:
- Open Skype.
- Proper subsequent to your profile avatar, click on on the three horizontal dots.
- Go to Settings.
- Navigate to Audio and Video settings within the left-sidebar.
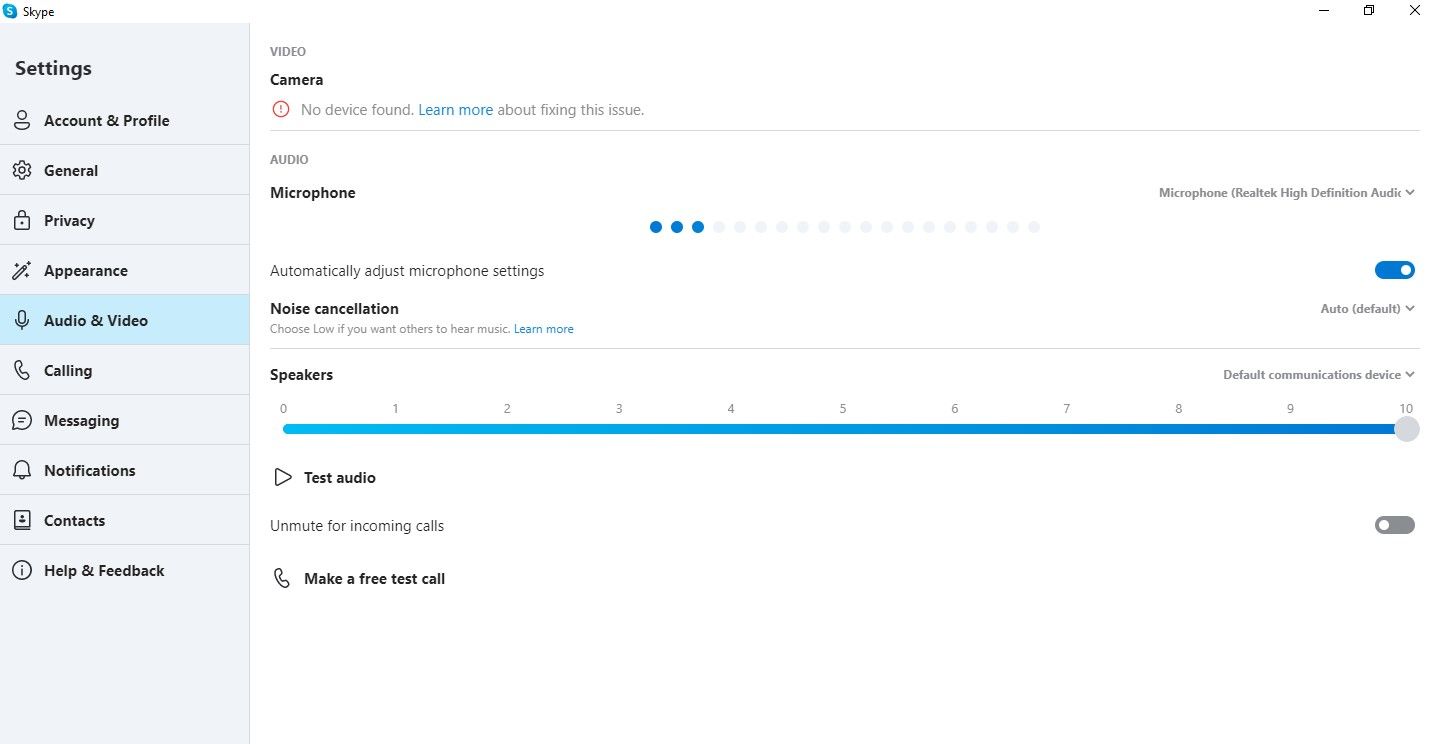
Be sure to choose the identical enter and output gadgets as in your system settings in Skype’s settings. Then, check each gadgets if nothing seems to be unsuitable there.
To do this, strive talking something into your microphone and see if the blue dots transfer. Additionally, click on on the Check audio button below the Audio system choice to see when you can hear something.
Possible, the problem lies someplace deep throughout the working system if both of those gadgets doesn’t run as anticipated, confirming Skype can’t entry them correctly. Proceed with the remaining fixes in that case.
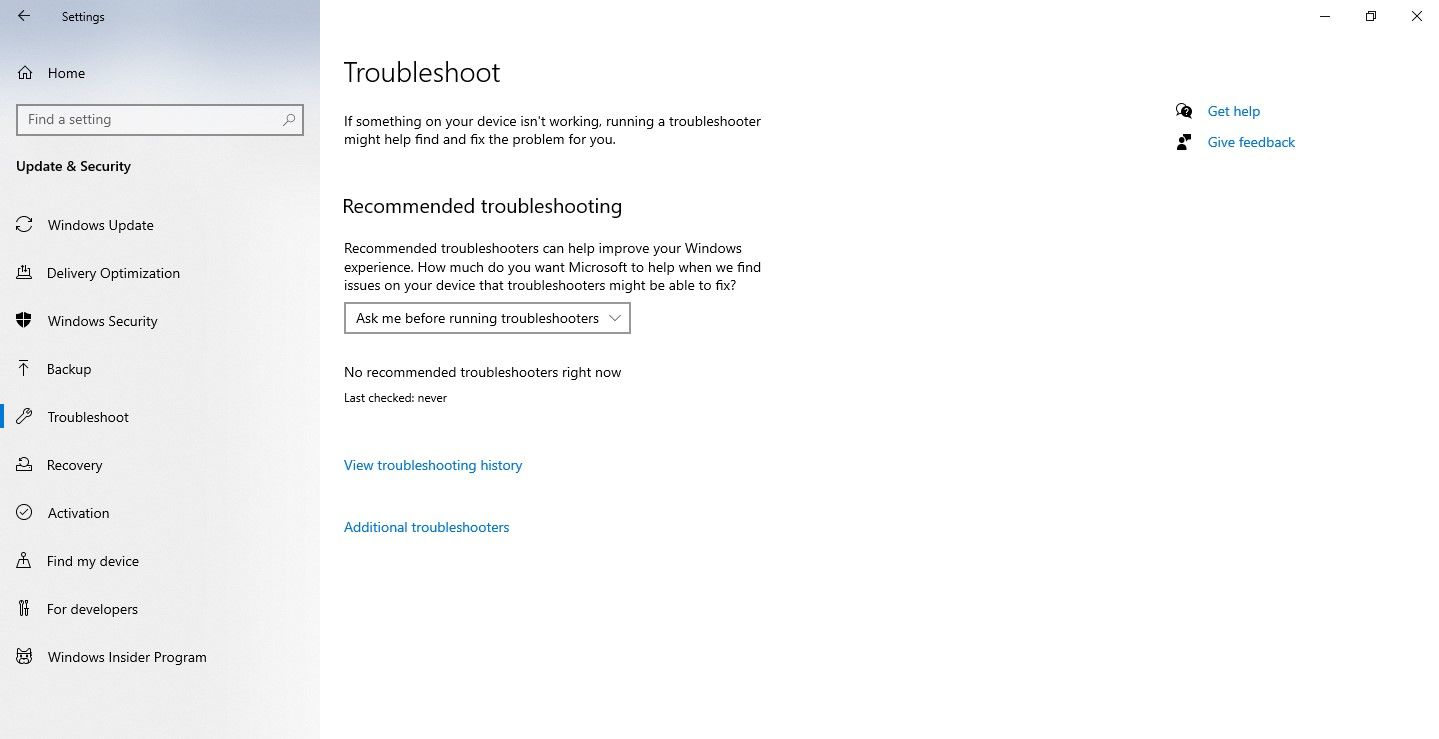
5. Run the Audio Troubleshooters
Run the built-in troubleshooters in Home windows first to rule out audio points stemming from the working system. The troubleshooter can diagnose and repair the issue by itself, which supplies it a very good probability of fixing Skype audio points.
Comply with these steps to run the audio troubleshooters:
- Open the Home windows Settings app.
- Go to Replace and Safety.
- Within the left-sidebar, click on Troubleshoot.
- Click on on Extra troubleshooters within the right-hand pane.
- Discover Enjoying Audio, click on on it, and hit Run the Troubleshooter.
- Find Recording Audio, click on on it, and hit Run the troubleshooter.
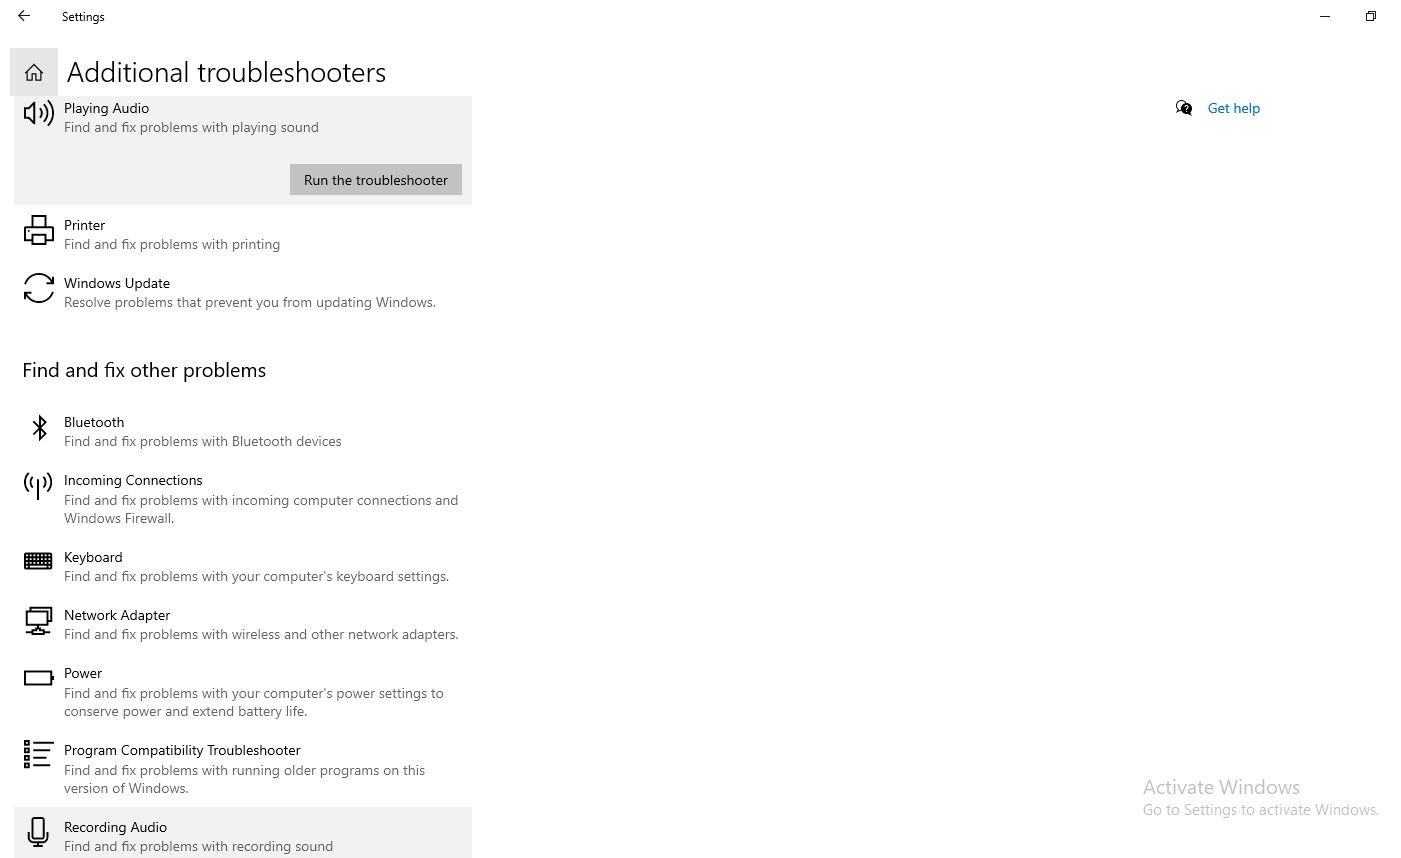
If each troubleshooters don’t resolve your situation, it’s best to replace your gadget’s sound driver.
6. Replace the Sound Driver
Comply with these steps to replace your gadget’s sound driver:
- Left-click on This PC and go to Handle.
- Go to Gadget Supervisor within the left sidebar.
- Increase the class for Sound, video, and sport controllers.
- Proper-click on the sound driver and choose Replace driver.
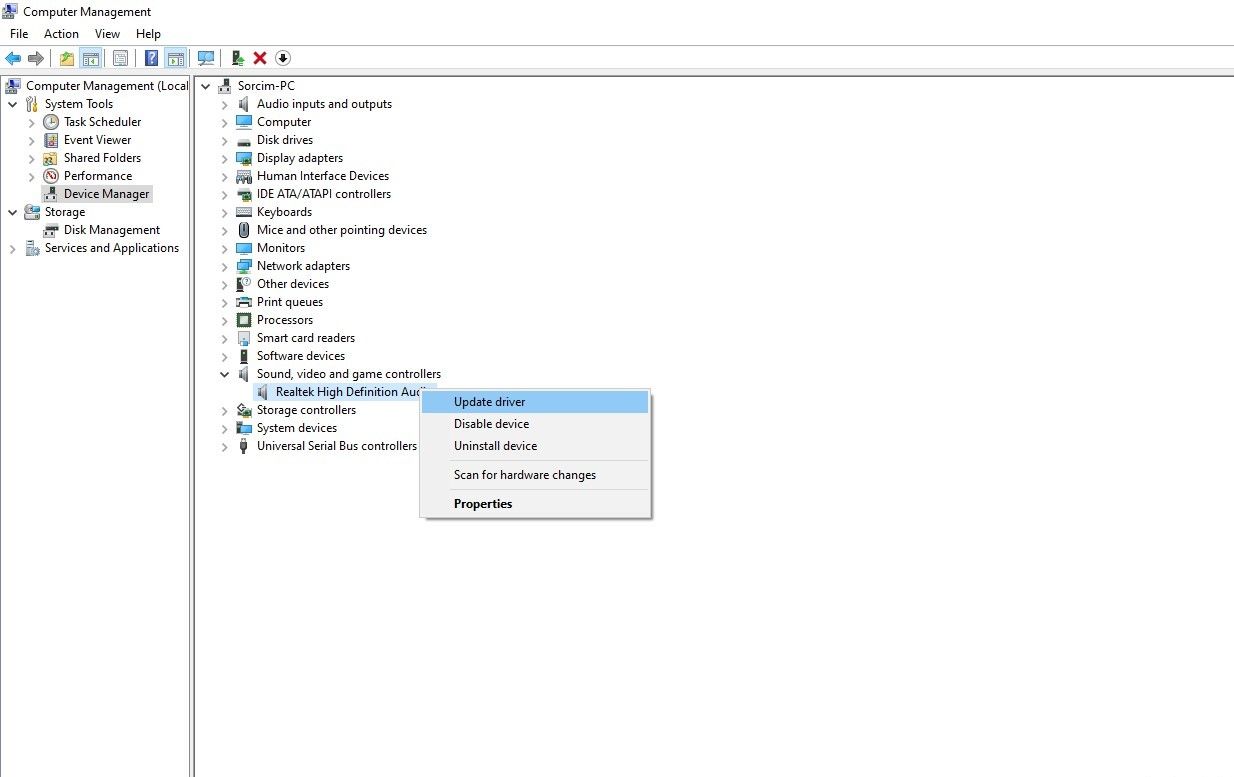
If you’re having this situation after a current Home windows replace that will have up to date the sound driver, it’s crucial to roll it again. This is how one can do it:
- Comply with the steps from one to 3 as described above.
- Proper-click the sound driver and choose Properties.
- Click on on the Roll Again Driver button below the Driver tab.

It’s best to reinstall the app if neither updating nor downgrading the motive force makes any distinction.
7. Reinstall Skype
If not one of the above fixes work, it is best to reinstall Skype. Nevertheless, be sure you correctly uninstall it earlier than doing so. Try this text on how to uninstall Skype on your Windows device.
Afterward, seize a contemporary copy of it and reinstall it in your laptop. It is seemingly a contemporary set up will resolve the issue. If the issue with the app persists, strive utilizing Skype’s net shopper briefly and report the issue to Skype help.
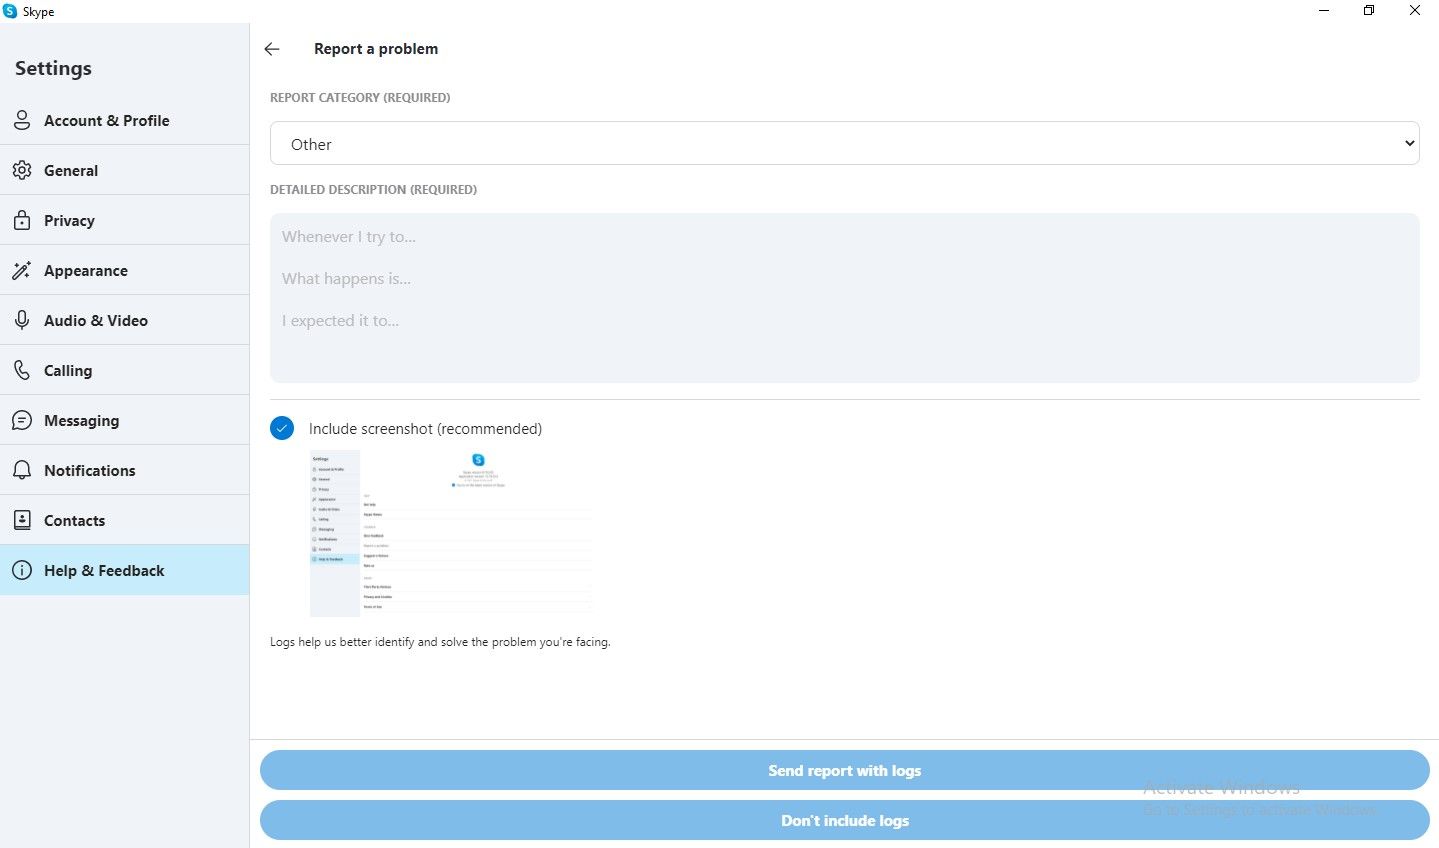
8. Report the Downside to Skype
You’ll be able to report an issue to Skype from the app’s settings. This is how:
- Open Skype.
- Click on on the three horizontal dots proper subsequent to your profile avatar.
- Go to Settings.
- Click on on Assist & Suggestions within the left-sidebar.
- Beneath Suggestions, click on on Report an issue.
- Select the related class, add an outline, add related screenshots, and select the suitable reporting possibility.
In case you face the identical situation together with your video, take a look at our article on how one can repair Skype video not working downside.
Skype Audio Nonetheless Not Working?
The fixes within the listing ought to allow Skype audio to work once more. In case all else fails, run an SFC scan to confirm that no corrupt information are inflicting the problem, run a malware scan to make sure that it is not interfering together with your desktop purposes, and, if potential, reset your Home windows settings.
Do not forget to report the issue to Skype whenever you try this. In the meantime, you’ll be able to briefly use Skype alternate options, comparable to Google Hangouts, Line, Tox, and so on.
Learn Subsequent
About The Writer
